Introduction of PsychoPy for Online Studies
How to confidently build your research online
2022 Workshop delivered by Sofia Pelica
Contents
Introduction
PsychoPy can have a sub-millisecond reaction time precision (Bridges et al., 2020), and it's the ideal tool for creating experimental tasks without writing any code!
Check out my Workshop Session with a step-by-step guide on creating a Stroop Task from scratch.
You can also see my pieces of advice and demos!
Feel free to contact me if you have any questions!
Note: Meanwhile, there's a new version. The steps we took in the workshop also apply perfectly to this new version.
Files used during the hands-on: 📎 workshopPsychoPy_files_sent.zip
1. Getting Started
1.1. Installing PsychoPy
1.1. Installing PsychoPy
Newest version: https://www.psychopy.org/download.html
Open your PsychoPy version, and you will see three windows.
- The Coder view is for experienced Python programmers. You won't need it.
- The Runner view is critical to see if any errors occur while building our task.
- The Builder view is the main window where we are going to work. Let's focus on this one.
If you start building your study in the builder view, do not change anything in the coder view, and vice-versa.
1.2. Creating a folder for your project
1.2. Creating a folder for your project
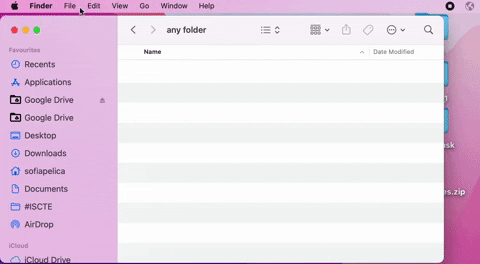
- First, let's create a new folder for our experiment. This folder needs to be in the Home folder.
- macOS users: open any folder. Then, select Go in the upper screen bar, and then Home.
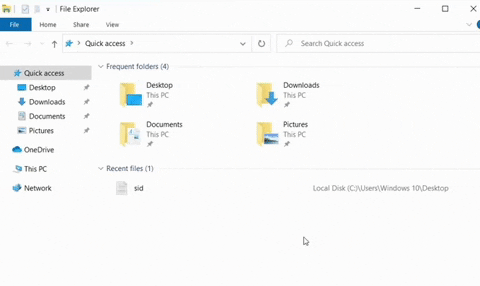
- Windows users: Open any folder. On the left bar, click This PC, then Disk C:, then Users. Click on the folder with your username associated with your computer. This is your Home folder.
- macOS users: open any folder. Then, select Go in the upper screen bar, and then Home.
- Name it
my_stroop. Do not use spaces, symbols, or accent marks on the folder and psychopy file names.⚠️Every file in the experiment folder will be uploaded to Pavlovia, so be sure you only put the required files and nothing else.
- Unzip and copy the files we sent you to the experiment folder.
- Make an alias on your desktop for easy access.
Save our PsychoPy file:

- On PsychoPy builder, click on the
Savebutton that looks like an old floppy disk.
- Choose a name without spaces for your psychopy file (e.g., my_stroop).⚠️Do not use spaces, symbols, or accent marks on the folder and psychopy file names. Do not put it on your desktop. Do not put it inside a cloud folder. There could be problems if it's inside multiple folders. Once submitted online, do not change its place.
- Placed it in the experiment folder that we created inside the Home folder.
1.3. Creating an account on Pavlovia
1.3. Creating an account on Pavlovia
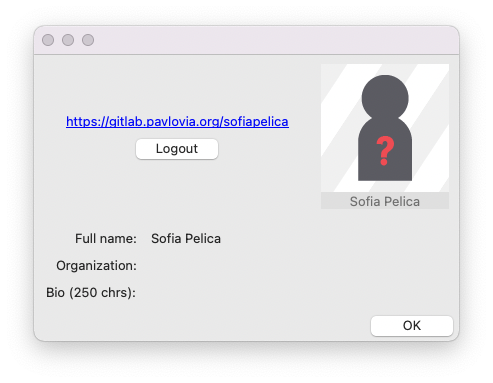
- Click on the
Loginbutton and register an account.
- After that, you should see your information. Now your PsychoPy is connected to your Pavlovia account.
2. Let's create our experimental task!
2.1. Configure the settings of your study
Click on the Settings button. 
2.1.1. Basic settings
- Choose your PsychoPy version.
- Confirm that the Escape key and info dialog are checked. ⚠️You should ALWAYS have the Escape key and Info dialog checked for online studies. The Escape keys allow Pavlovia to send participants incomplete data quickly if they want to leave. The info dialog will enable Pavlovia to download the resources to the participant's browser before your study begins.
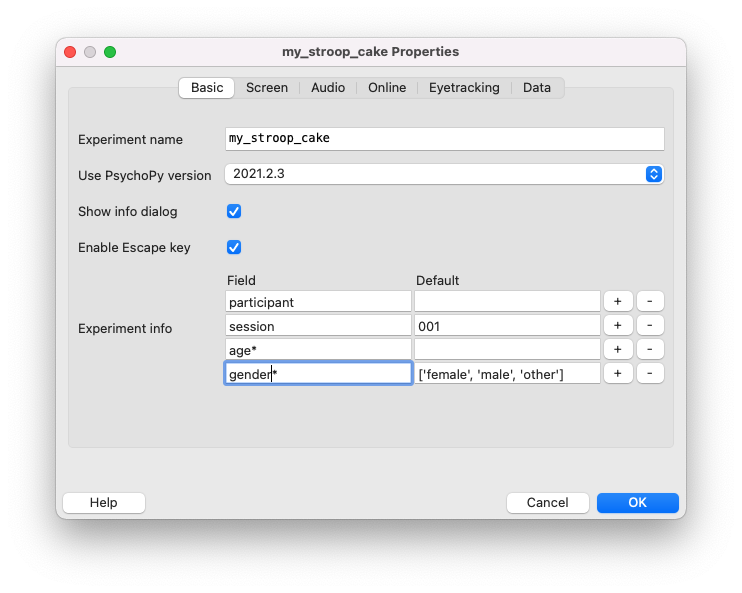
- Add a question about age and gender in the Dialog window:
3.1. Click
+button.3.2. Write “age” and “gender” in the left column.
⚠️PsychoPy online gives an error if you use curve parenthesis()in any cell of the info dialog.3.3 In the age question, we want an open response, so we should empty the right cell.
3.4. In the gender question, we should write some options:
['female','male','other']⚠️PsychoPy needs to know what words and variables are, so we have to use single straight quotes to let PsychoPy understand that this is not a variable. And the parenthesis needs to be brackets to let PsychoPy know that this is a drop-down list.3.5. We want to force participants to answer age and gender, so add an
*asterisk. Note that the OK button is unavailable until the age and gender are answered.
2.1.2. Screen settings
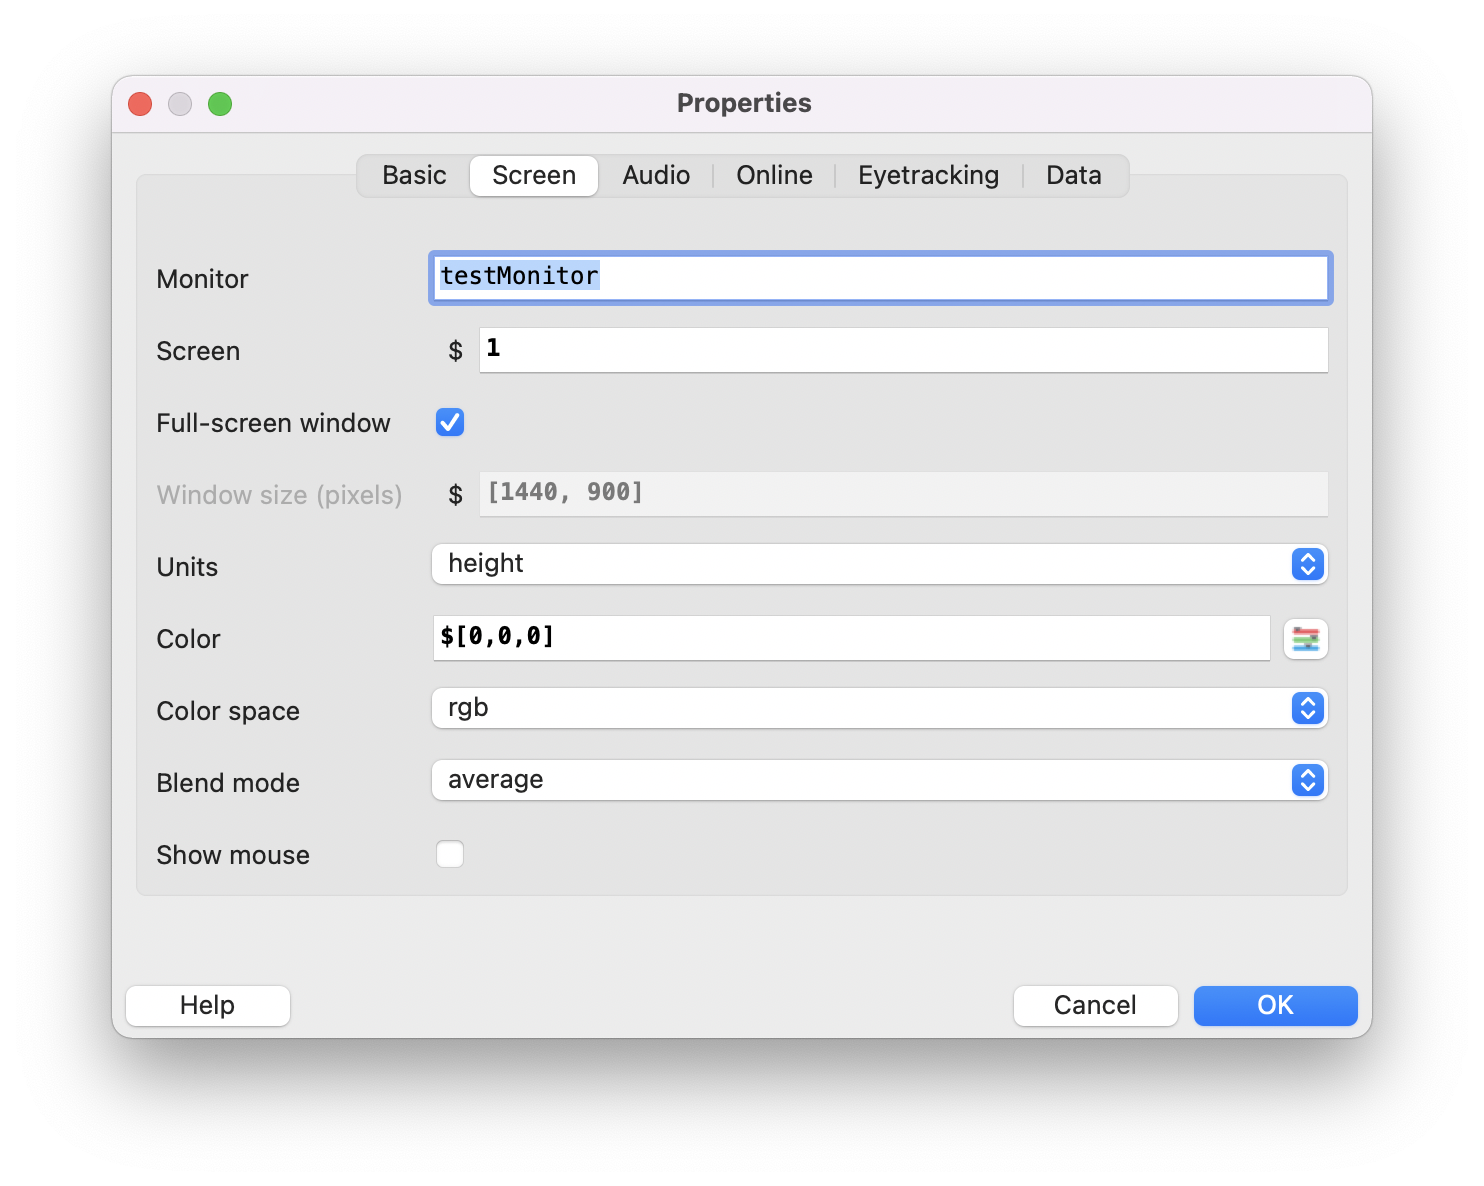
For online studies:
- The full-screen window should be checked.
- We must define Units. I recommend using height or pix. Be aware that this impacts how we will determine the font size in your study. Let's choose height.
- We must define the color (i.e., the background color of your study):
- Grey background
$[0,0,0]
- White background
$[1,1,1]
- Black background
$[-1,-1,-1]
- Always use this
[]bracket parentheses.
- Grey background
- About color space: I recommend
RGBorHEXonline, but we can write "green" or "white" while programming our task. Be aware that this impacts how we define the font and background color.
2.1.3. Audio settings
This is for offline studies. For online studies, you have to follow the same steps as images (see Adding a Stroop task with images).
2.1.4. Online settings

- Make sure the
Export HTMLis selected with “on Sync”.
- I recommend leaving the other fields empty in this section unless you have a particular objective.
2.1.5. Data settings
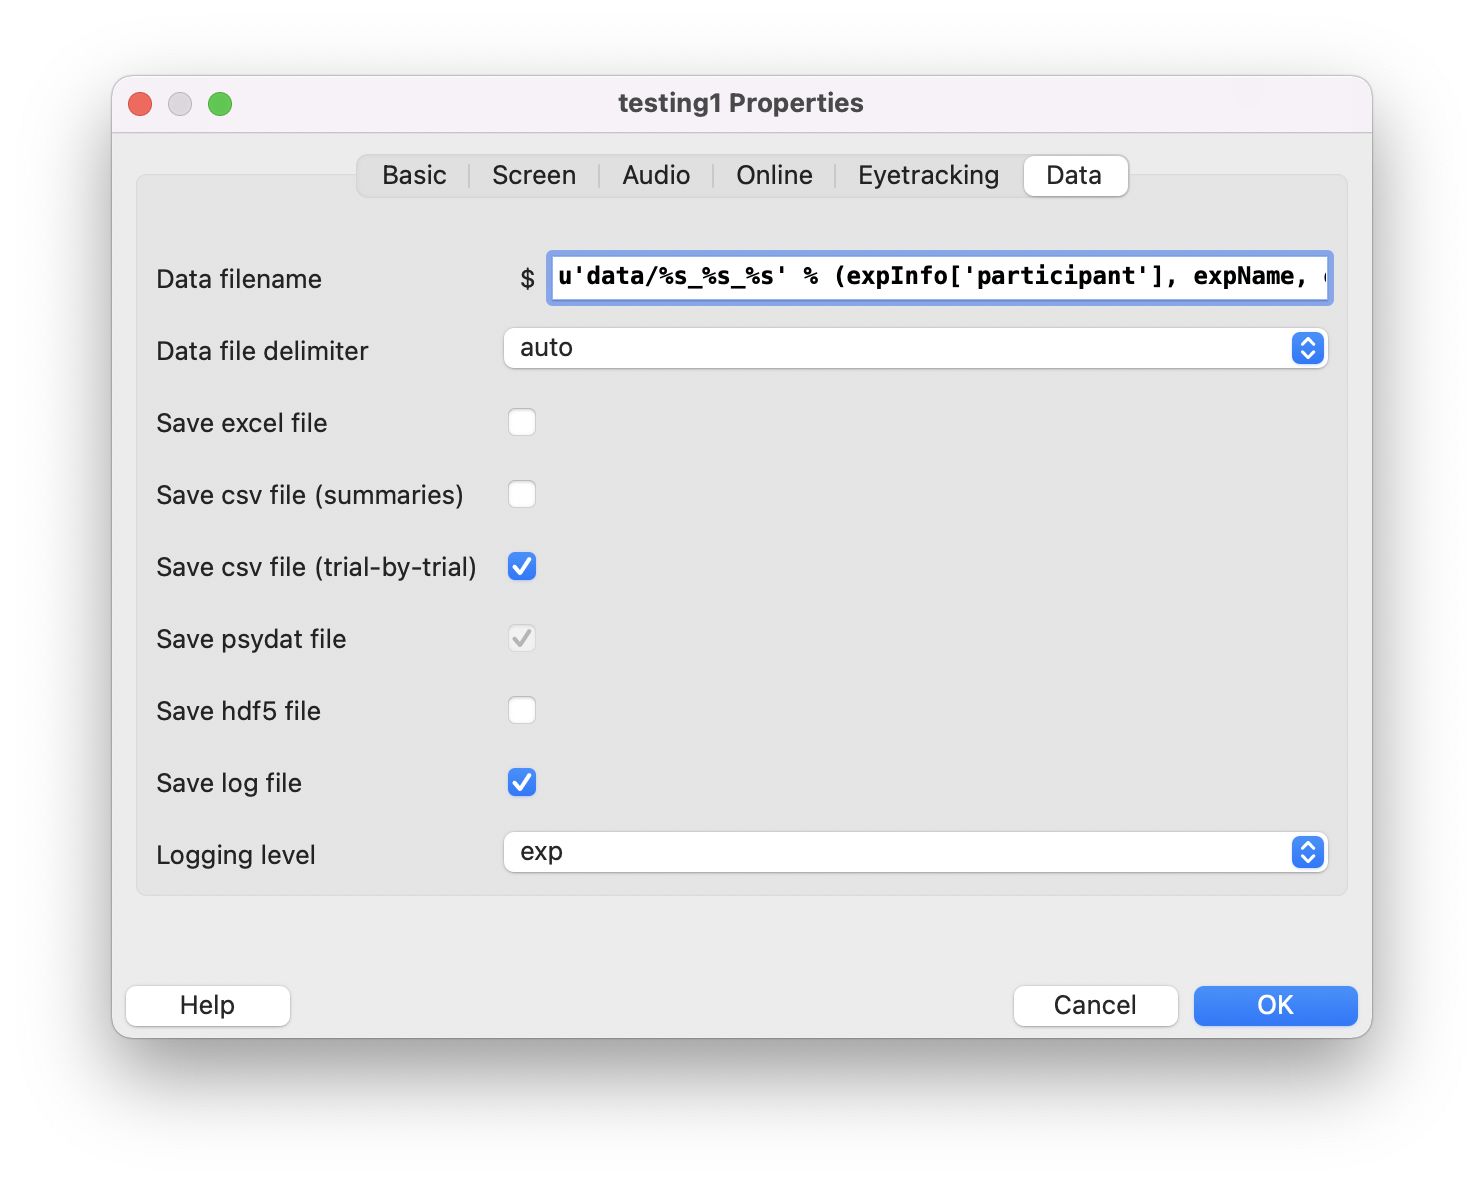
Do not change anything in the data filename unless for particular reasons. This defines where data will be saved on your computer and the file's names. By default, it has the name of your study and the date (e.g., ANONYMOUS_my_stroop_2022-02-01_14h26.01.433.csv).
The options for saving are defined in Pavlovia, not here.
Do not change anything in here. Click OK.
2.2. Program the Stroop Task

The Stroop task demonstrates that it is difficult to name the ink color if there is a mismatch between the ink color and the written word (e.g., "blue" written in red ink). Therefore, we will consider the Stroop effect as the average response time in conflict trials minus congruent trials (Oh et al., 2012).
We will only use three colors and two conditions to simplify this workshop.
Congruent condition: The color of the word and the meaning is the same
Conflict condition: The ink of the word and the meaning is different (e.g., “blue” written in red)
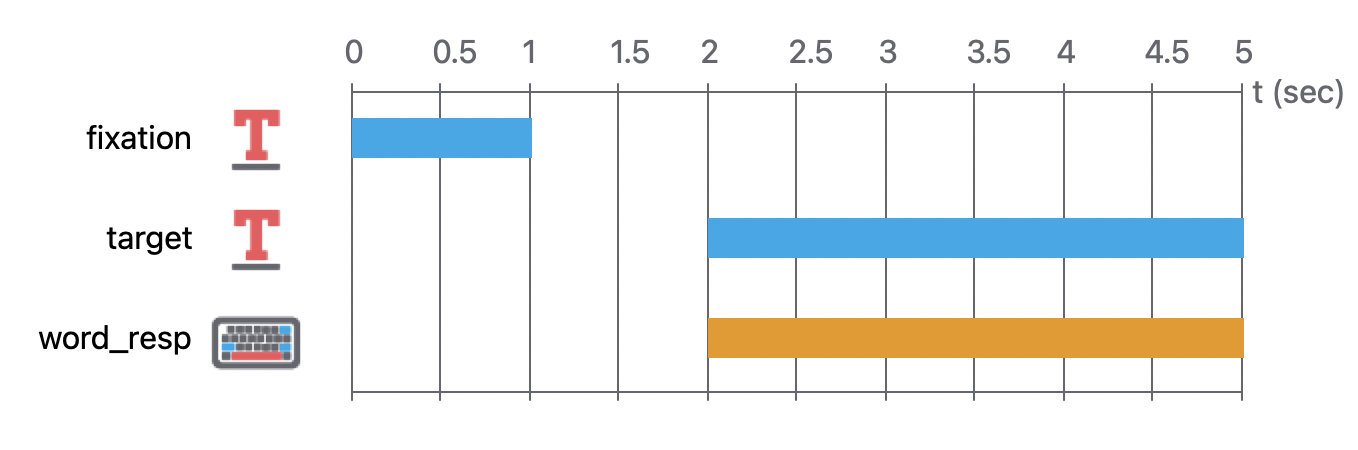
Each stimulus will be presented for 3 seconds or until the participant responds.
Participants need to respond to the ink of the words (not the meaning) by pressing a key.
Left for red COLOR
Down for green COLOR
Right for blue COLOR
The next stimulus will be presented 2 seconds following the last stimulus when participants respond.
2.2.1. Thinking about conditions
Open the condition_words excel file we sent you.
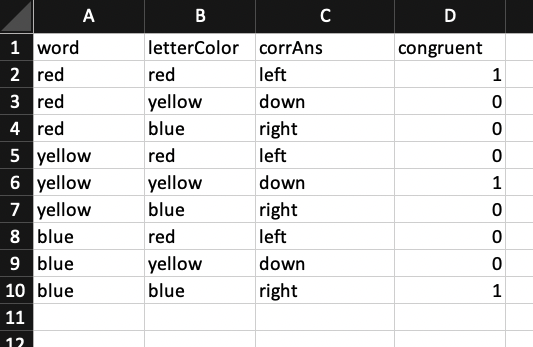
The first row is the name of the variables.
The A column is the word. We named it “word”
The B column is the ink.
The C column is the correct key that participants should press.
The D column is the Stroop color match. 1 = congruent, 0 = conflict. We are not going to use it as a variable. This is just going to show up in the results file to facilitate our analysis. Instead of 1 and 0, we could write anything here.
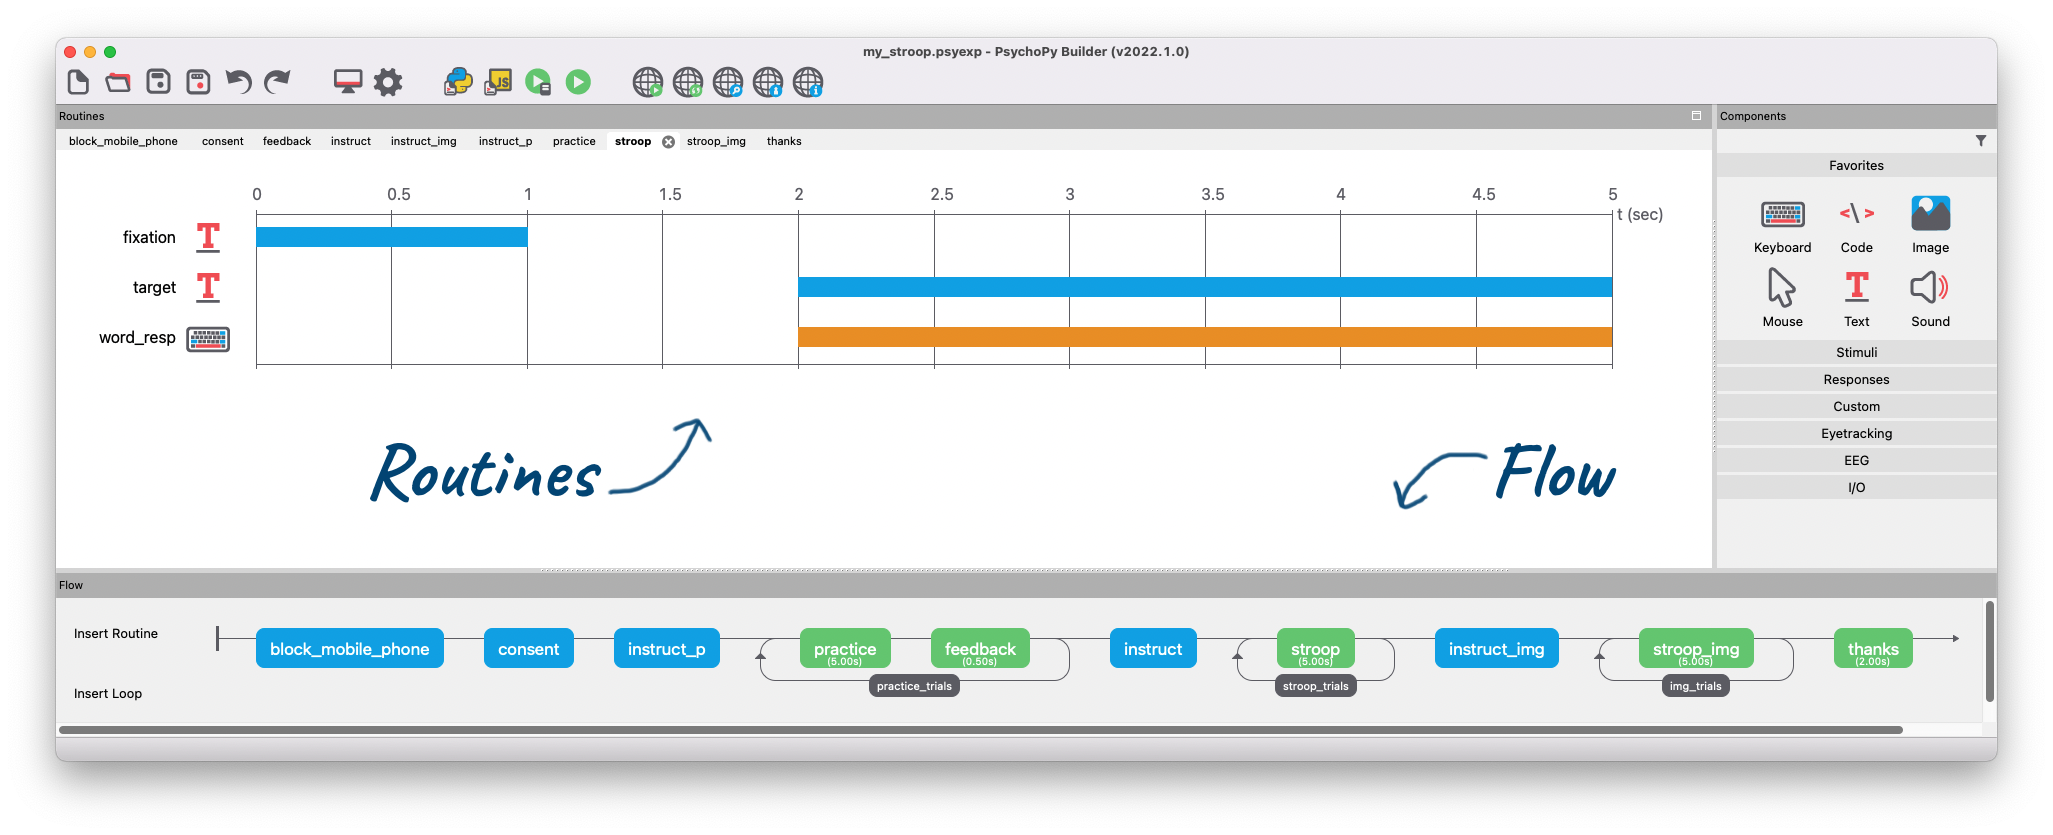
2.2.2. Add a Routine
Right-click over the routine Trial. Rename it to stroop.
2.2.3. Add a text component (Fixation Cross)
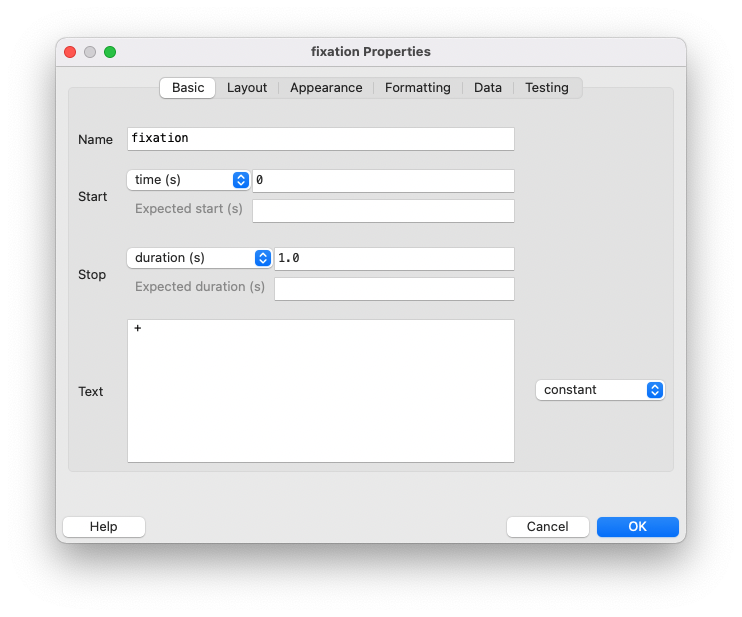
- Rename it
fixation.
- Start time: 0
- Duration: 1.0
- Text: +
- Constant
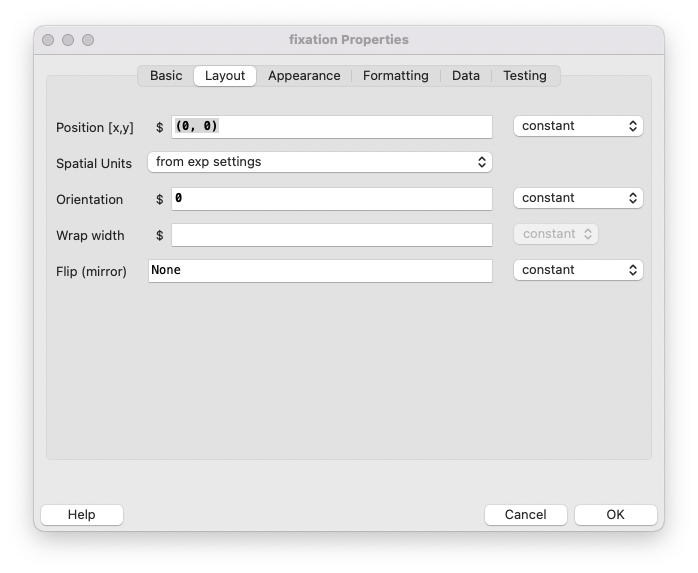
The position (0,0) determines that the fixation cross will appear in the center of the screen.
If we want to place it more to the left, maybe write (-5, 0).
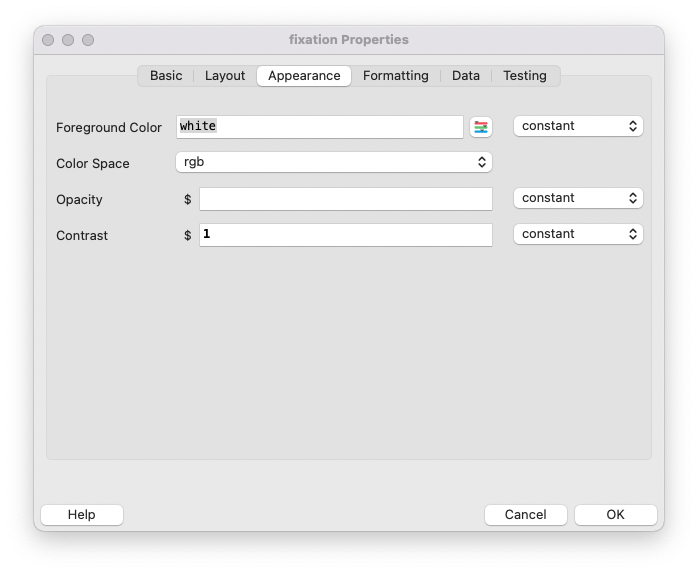
Let's leave it like that.
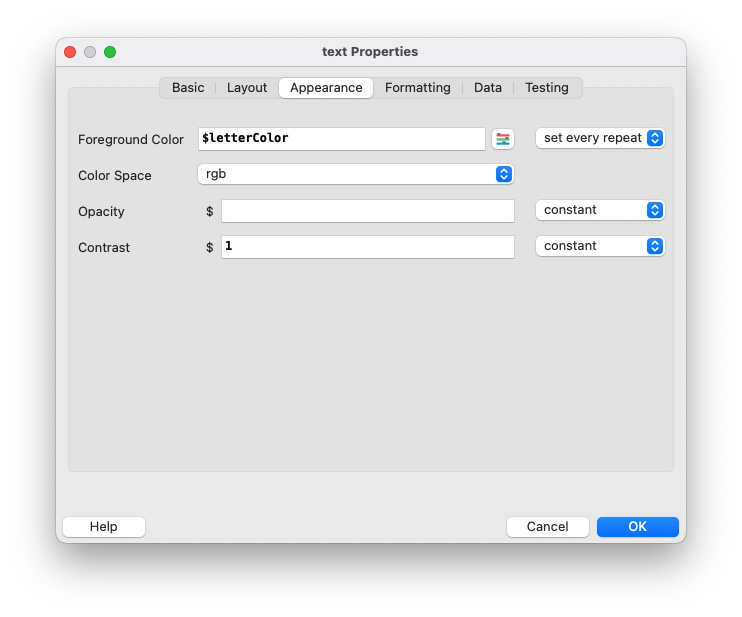
Opacity is transparency. Contrast is to invert the color (-1).
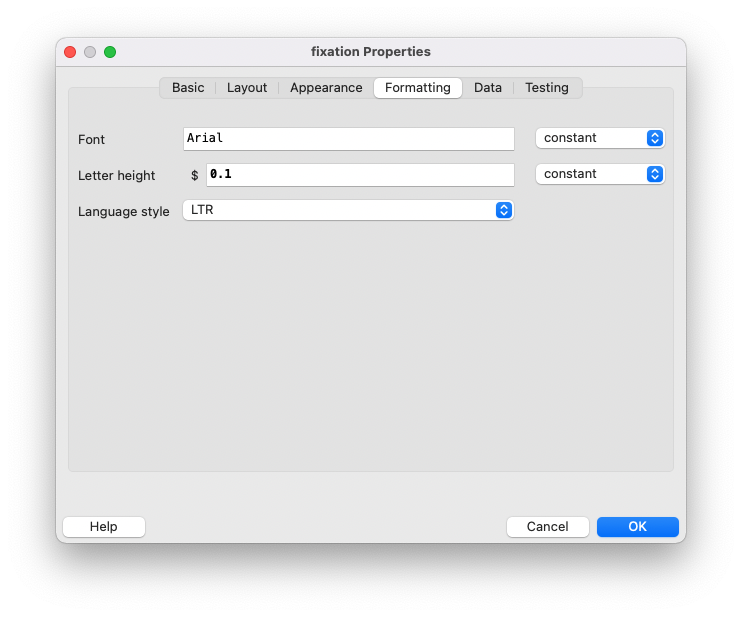
We want Arial as the font. By the way, we can use ANY google font.
This doesn't work online. If you want to register when a word appears, you need to add a little code.
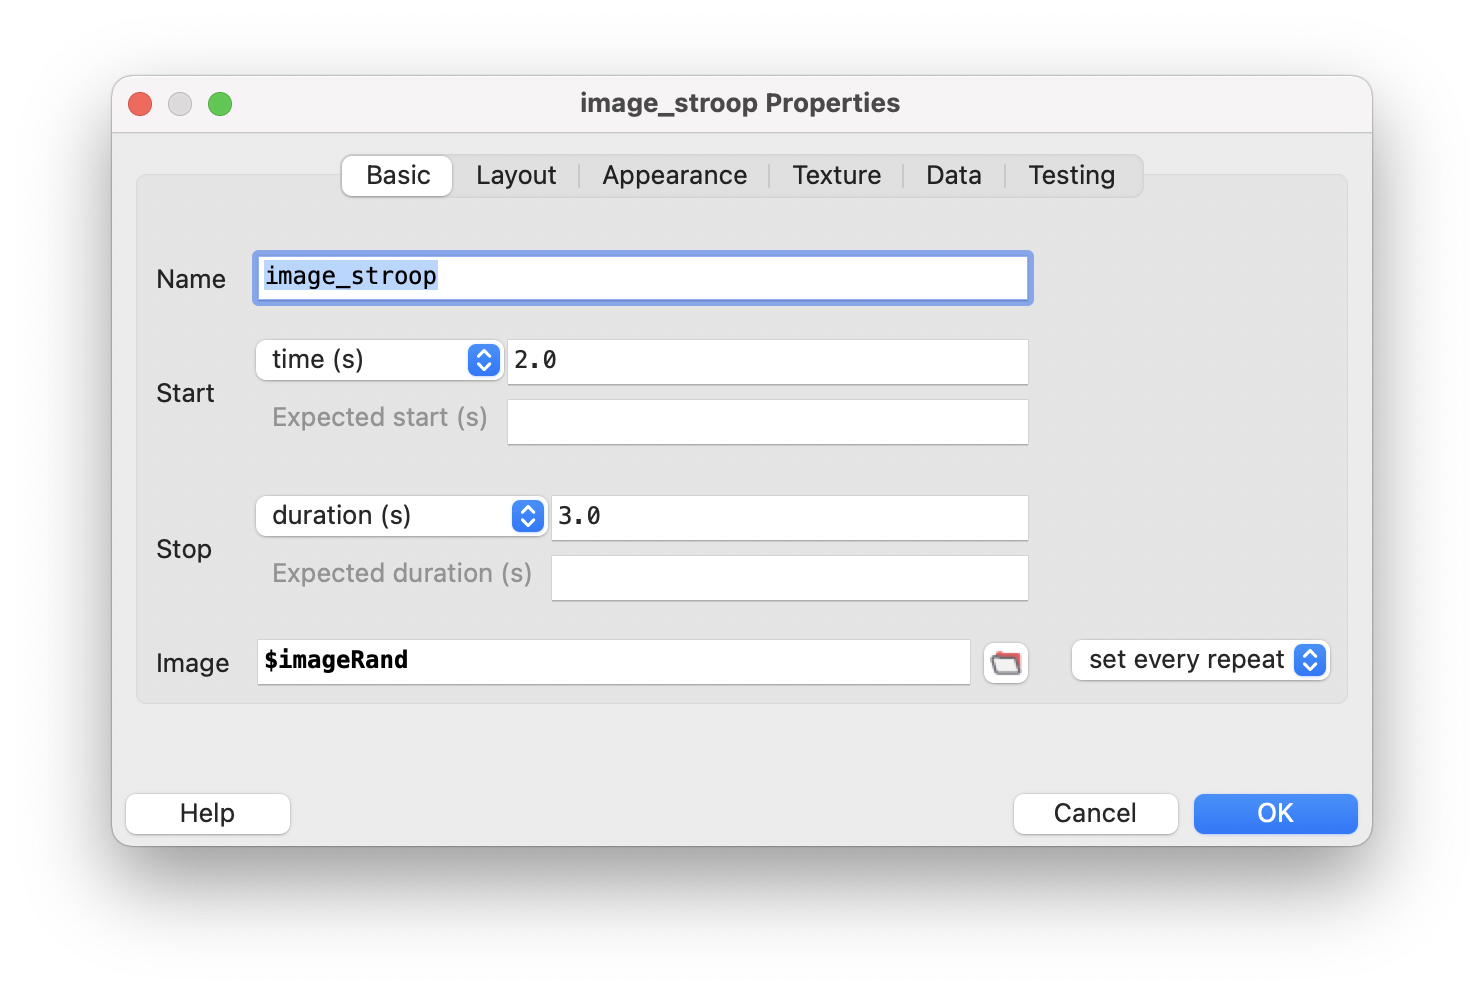
2.2.4. Add a text component with variable (Words)
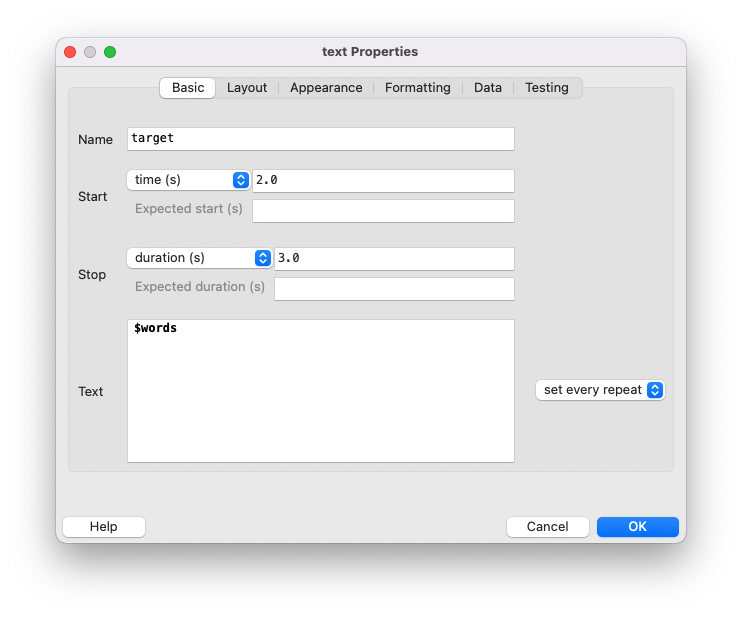
- Name it
target.
- Start time: 2.0 s (because 1.0 seconds for the fixation cross and 1.0 for the empty screen)
- Duration time: 3.0 s. We should use time limits on online studies.
- Text:
$words. Since this is a variable, we have to put the $.
- Set every repeat.
- Write
$lettercolourto connect to our variable. This will be determined by the excel file. Variables names are case sensitive.
- Set every repeat.
2.2.5. Add keyboard response
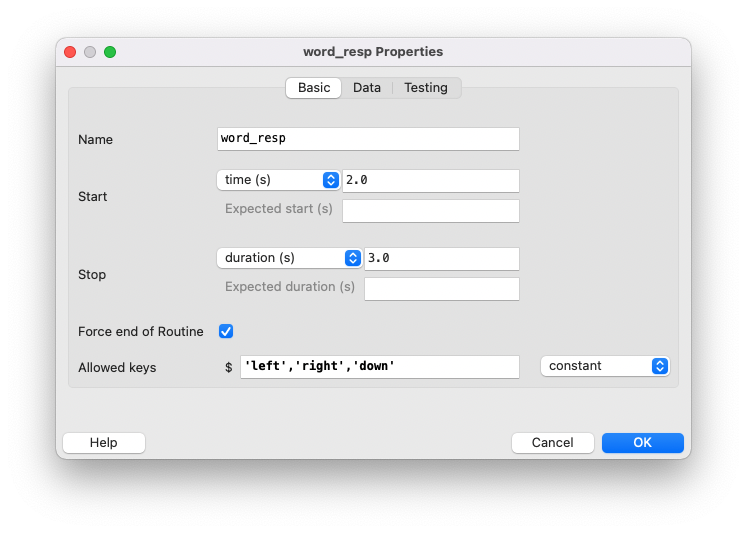
- Rename it
word_resp.
- Start time: 2.0 seconds (appear at the same time as the words)
- Duration time: 3.0 seconds
- Force end Routine checked. This means this routine will end earlier when the participant presses one of these keys. If we didn't put a duration and check the force end routine option, the routine only ends when the participant presses the key. If the participant goes to the bathroom mid-study, this will be stopped forever. That's why some people advise using the duration limit in everything for online studies.
- Allowed keys:
'left','right','down'. Note that key names (even for number keys) should be given in single straight quotes, separated by commas, e.g.,'m','z','1','2'. If this box is left blank, any pressed key will end the routine. The space bar is'space'. Don't use Escape for this.
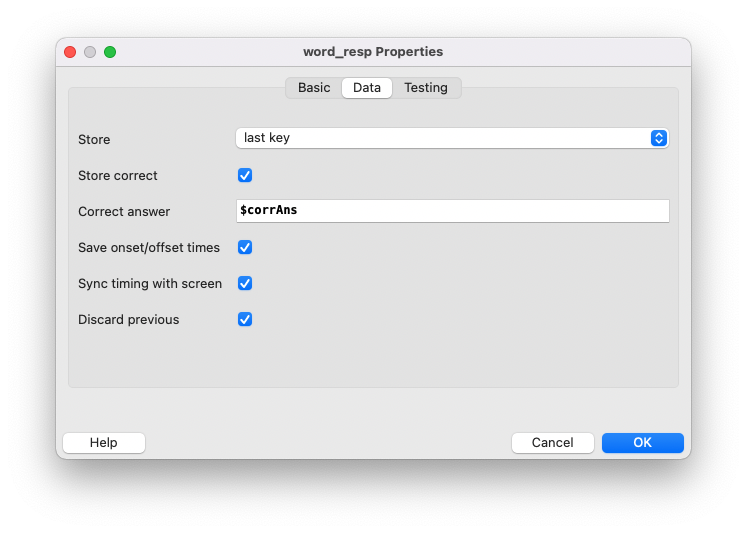
Store: This asks which key press, if any, should be stored; the first to be pressed, the last to be pressed, or all that has been pressed.
Discard: Check this box to ensure that only key presses that occur during this keyboard component period are used. If this box is not checked, a keyboard press that has happened before the start of the component period will be interpreted as the first keyboard press. This can be confusing to have in your results file.
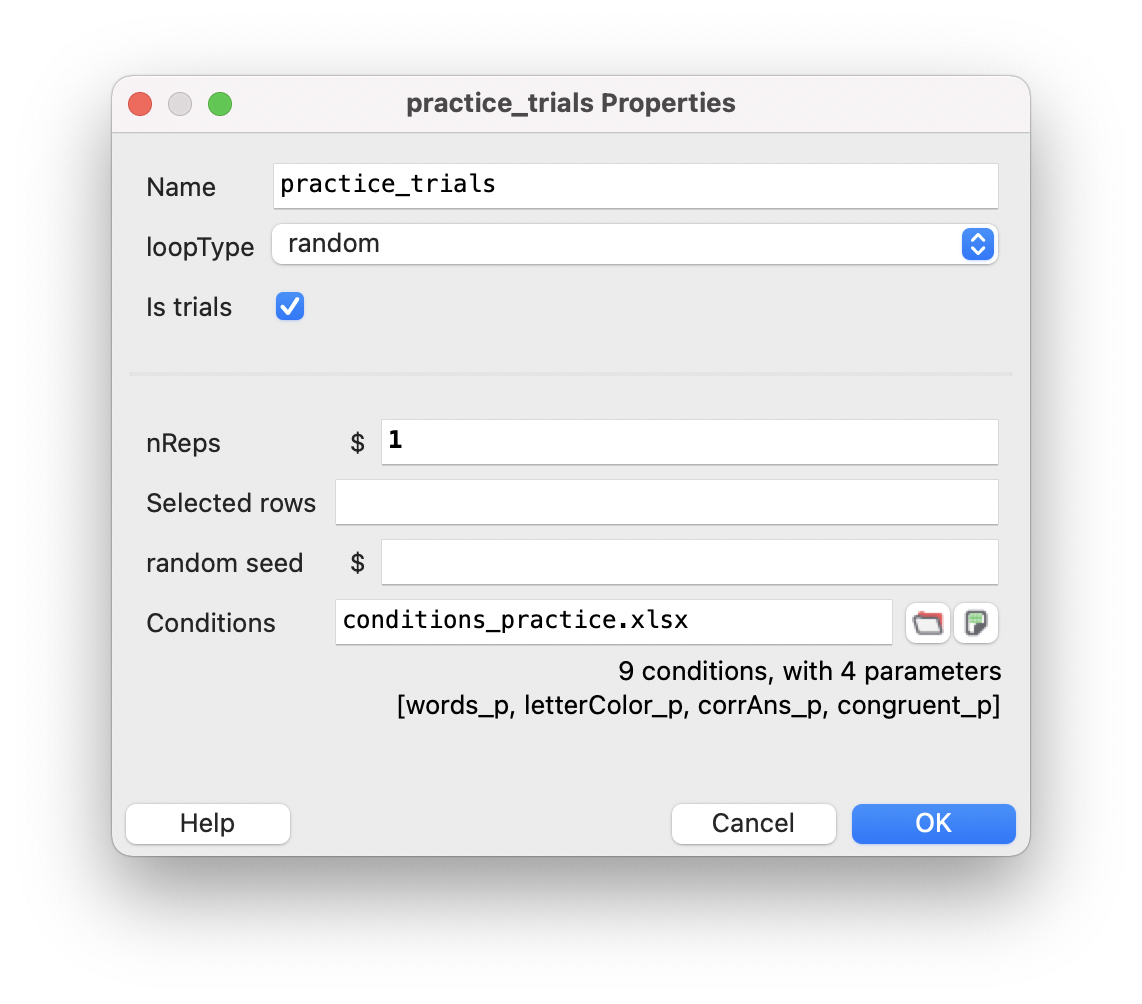
2.2.6. Add the Conditions file
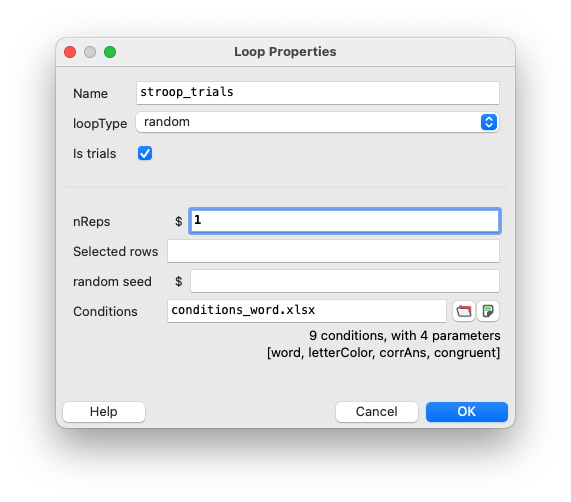
- Insert Loop, go around the routine.
- Choose random.
- Random - present abc in a random order, because we have nReps at 2, this would be repeated twice (e.g.
[c, a, b, a, c, b])
- Full Random - present abc but it would be possible to get
[a, a, b, c, c, b]. The same trial twice in a row.
- Sequential - present the rows in the order they are set in the excel file.
- Random - present abc in a random order, because we have nReps at 2, this would be repeated twice (e.g.
- Trial checked.
Some loops are not trials but a set of blocks. We don't want the data file to add a line in the results file if it's a block, so we have to uncheck this. But this is not our case.
- nReps: 1
The number of each row of our condition file will be repeated. We have nine trials, and we don't want repetition, so we will write 1.
If we wanted a repetition, we could write 2, and then we would have 18 trials.
2.3. Submitting to Pavlovia
- Click on the second web icon.

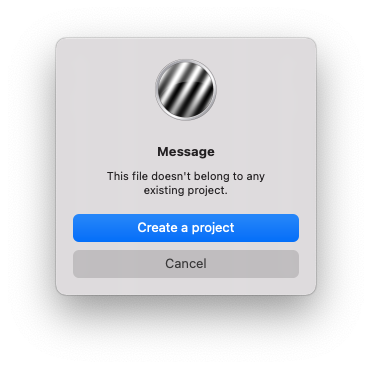
- This is the first time submitting this project. A pop-up asking to create a project will appear.
- Name your official project. This name will appear in the link that you are going to share with the participants.
- Since this is the first time, we have to go to the Pavlovia site https://pavlovia.org/dashboard?tab=0 and activate our project to pilot mode.
- Go to Dashboard > Experiment > click on the project. Then click on Pilot under the status. To run the experiment, click on the Pilot button next to the View code.

2.3.1. How to open a CSV file
- Since we are in pilot mode, your browser should download your data automatically.
- I am going to show you how to open this kind of file .csv on excel.
- Open excel.
- Go to the Data tab.
- Select Get data > From text
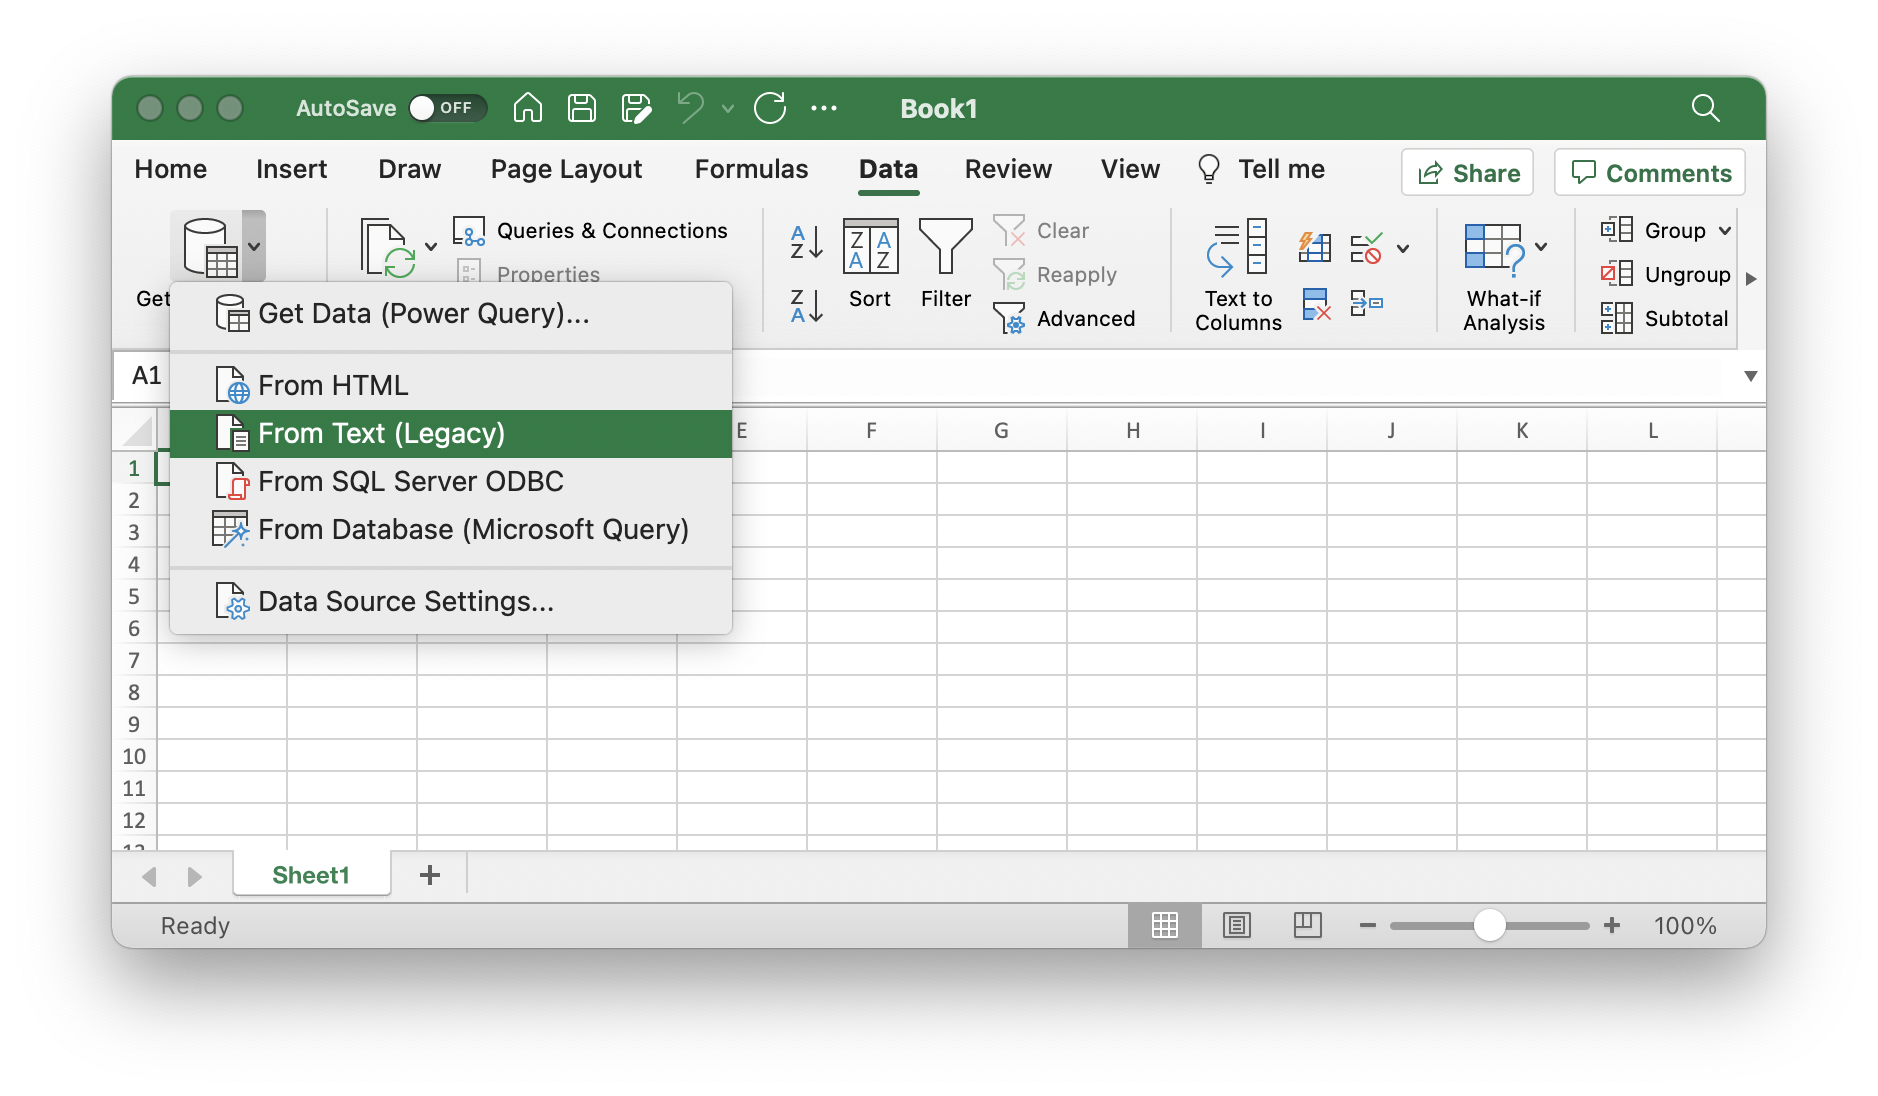
- Select the downloaded file from Pavlovia.
- Select Delimited > start import at row 1 > file origin Unicode UTF-8
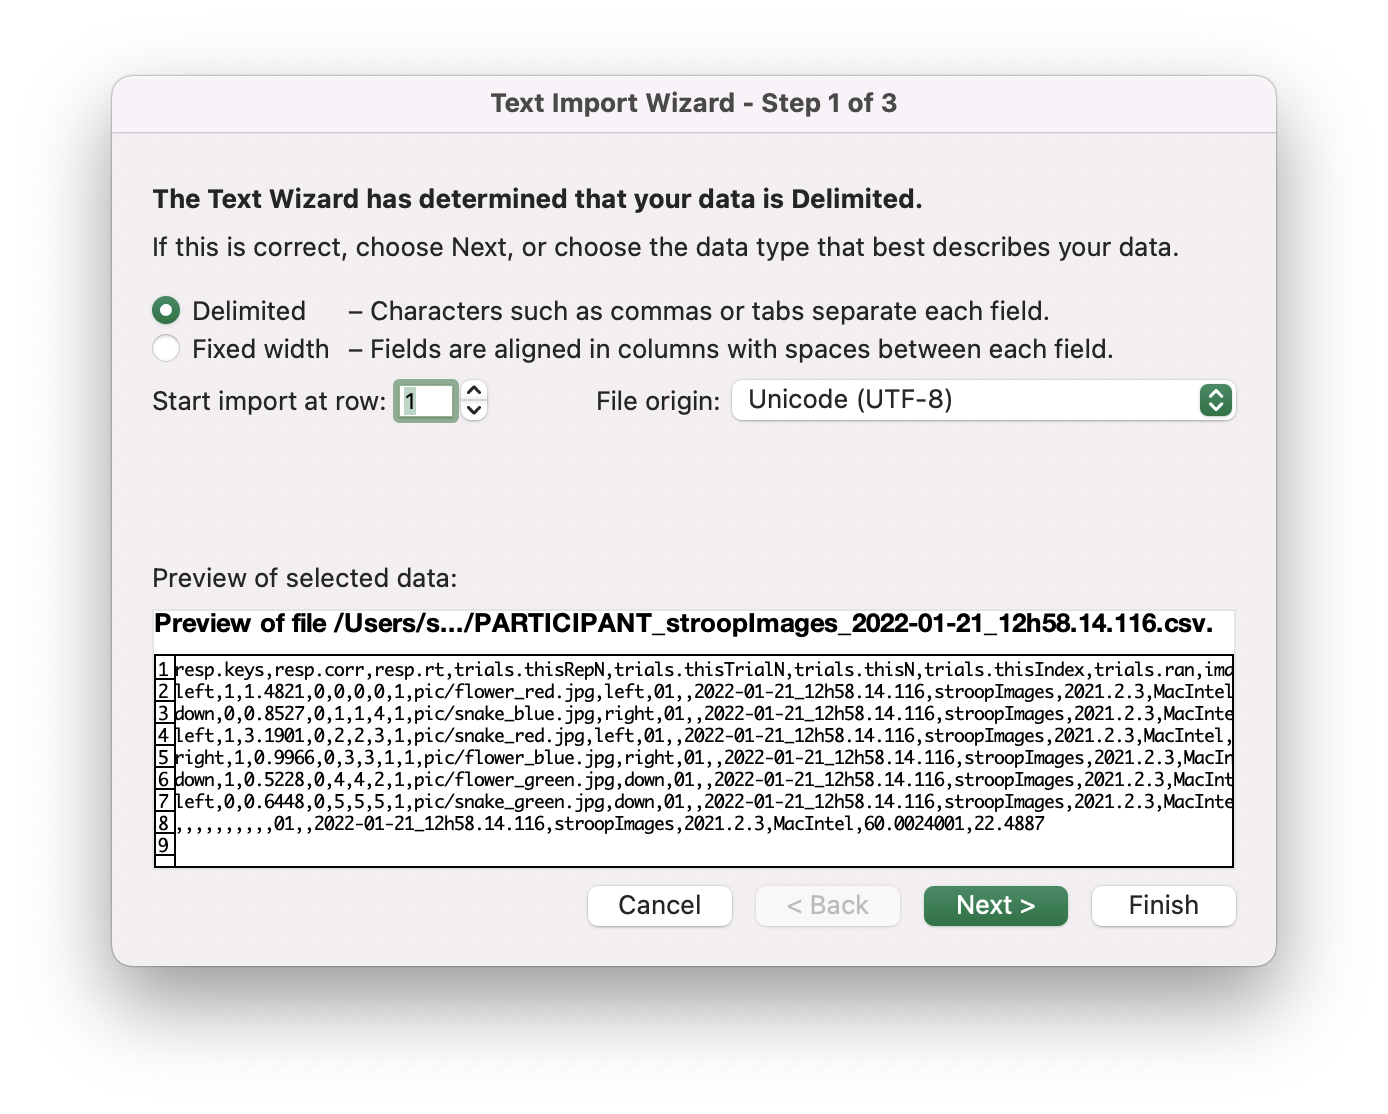
- Select comma.
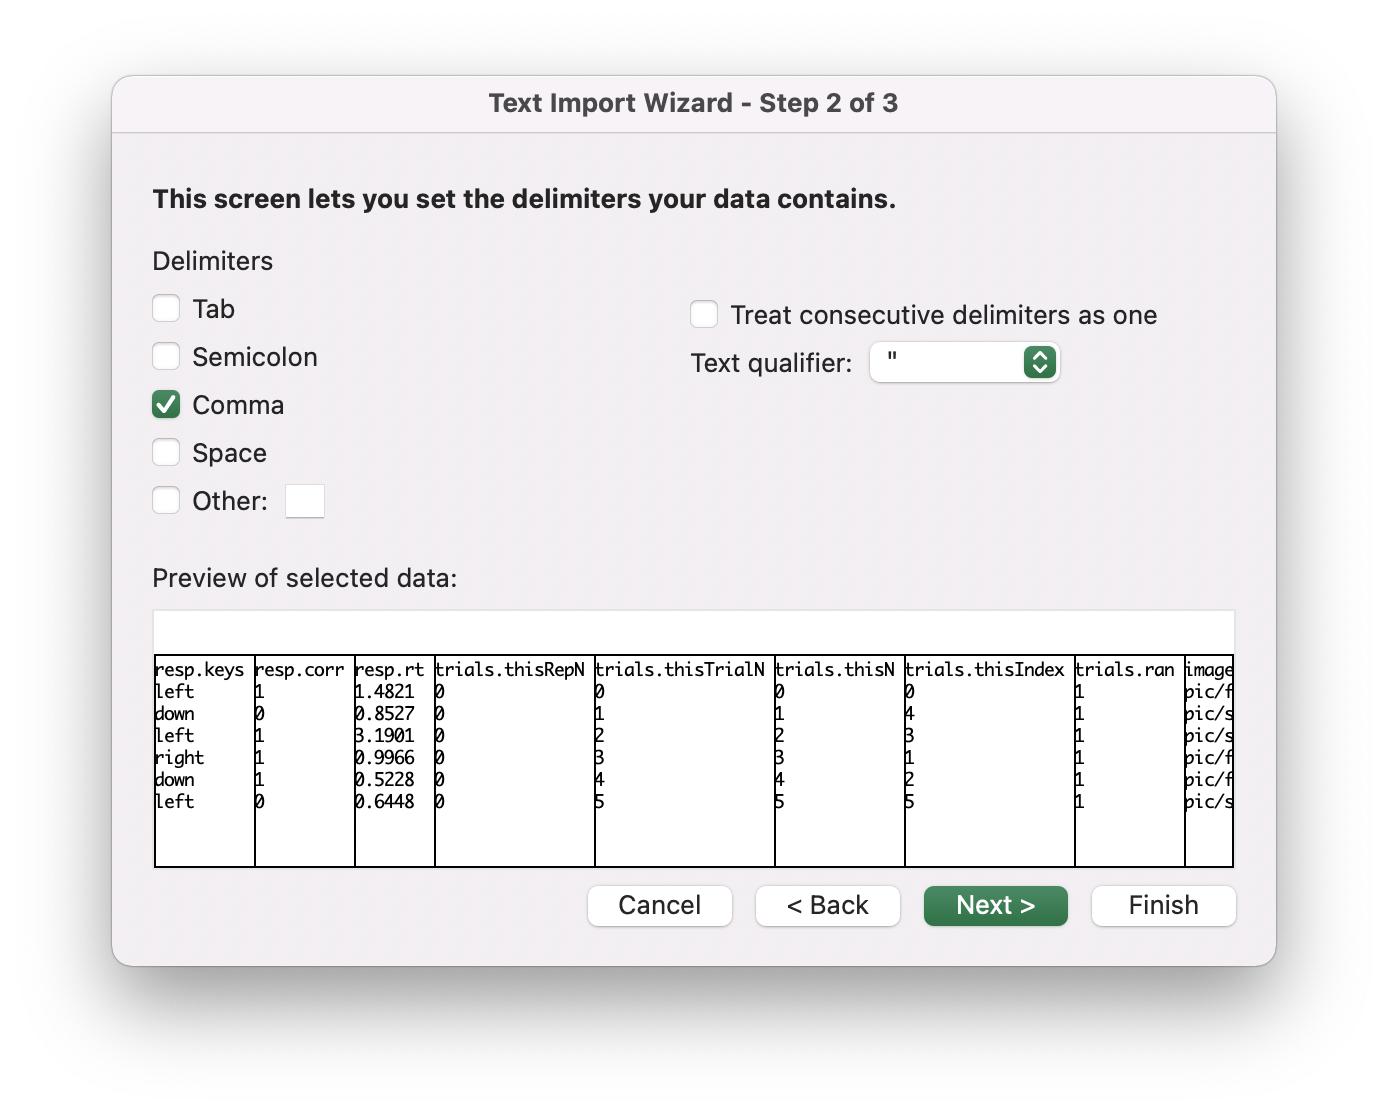
- Click General.
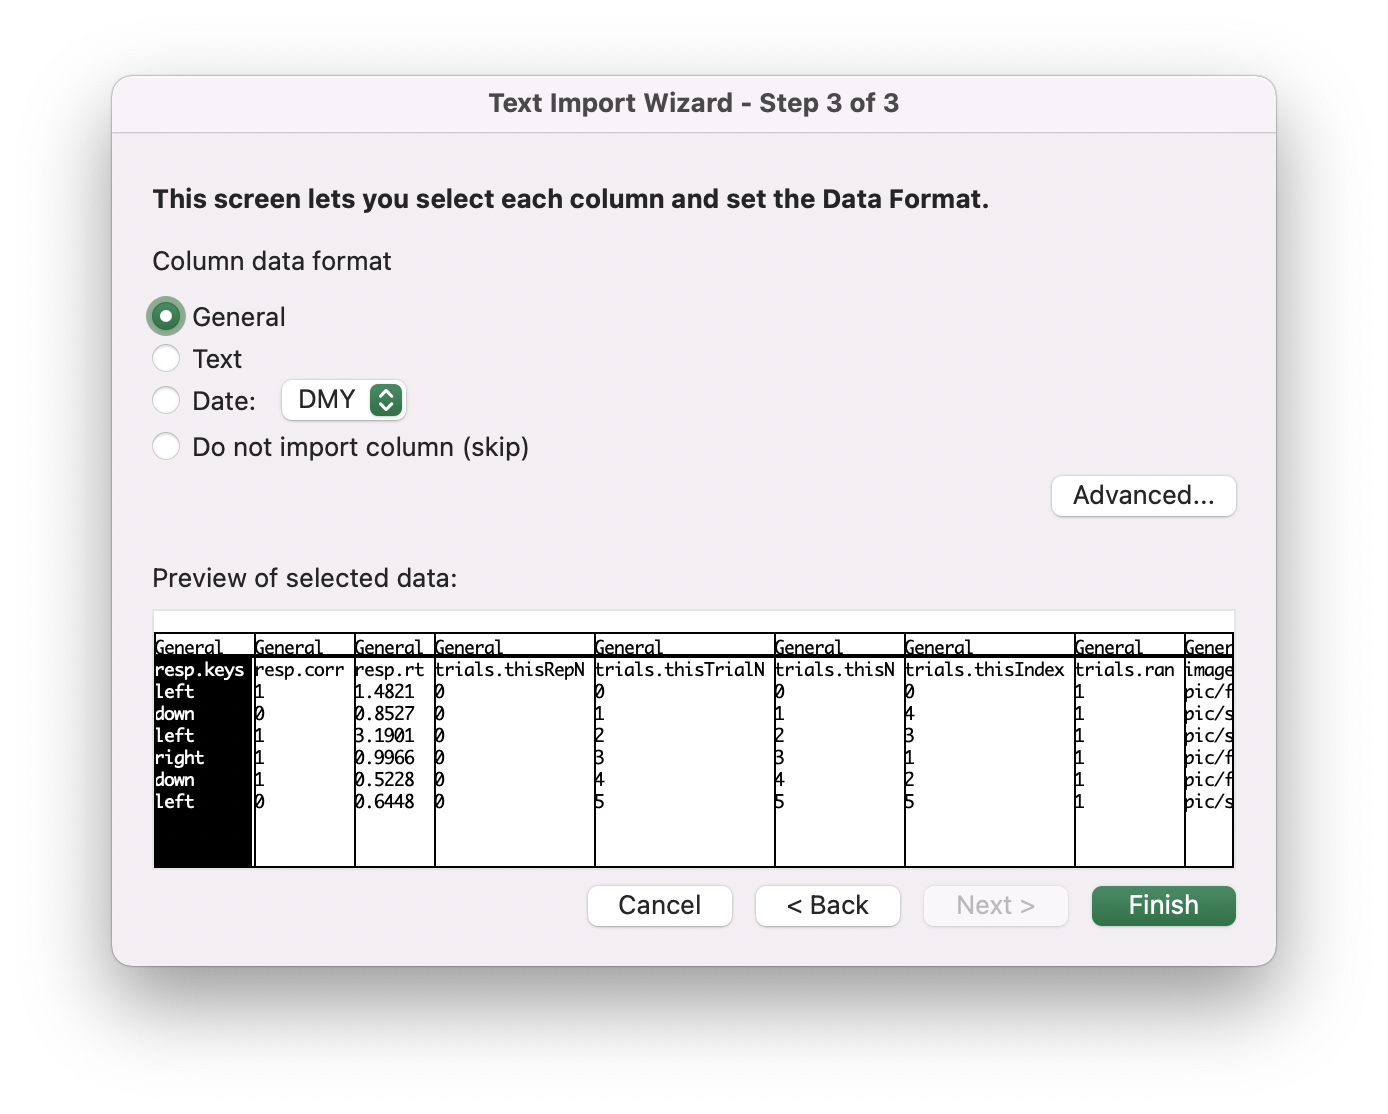
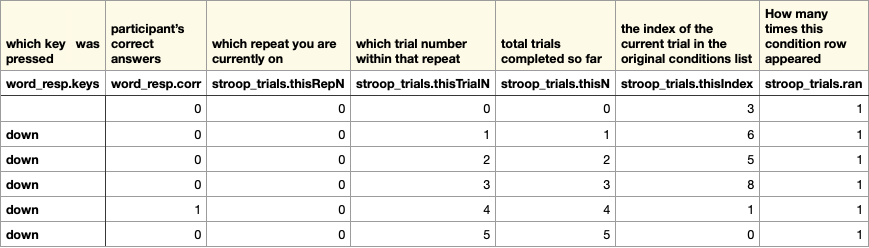
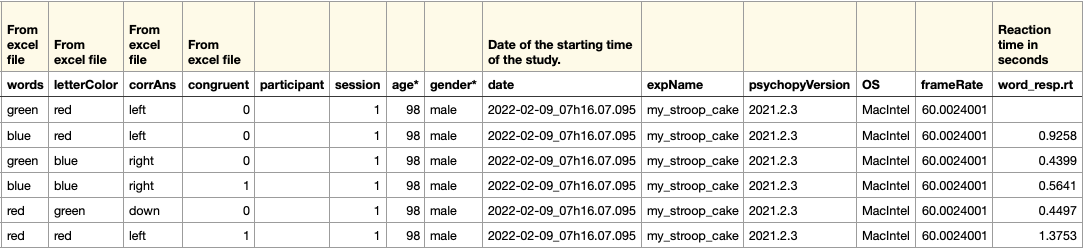
2.3.2. How to interpret the data file
Now you can see what data you have:
2.4. Adding consent, instructions, and practice to our study
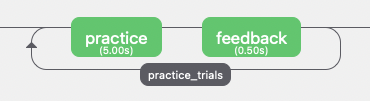
2.4.1. Practice with feedback
2.4.1. Practice with feedback

- Select Stroop trial. Go to the upper bar and select experiment > copy routine. Go again and select paste routine. Name it
practice.
- Add a new routine. Name it
feedback.- Add a text component. Name it
feedback_text
- Start time: 0
- Duration: 0.5
- Text:
$f_msgset every repeat
- Appearance:
$f_colorset every repeat
- Formatting: Arial, 0.05 font size
- Add a text component. Name it
- Add code
- Begin routine
- JS
- Add this code:
if (NAMEKEYBOARD.corr) {
    f_msg = "Correct";
    f_color = "green";
} else {
    f_msg = "Wrong";
    f_color = "red";
}
Go to the practice routine and copy the name of the keyboard component. Paste it to the feedback code, and replace it with “namekeyboard”.
- Insert loop. Add excel file from practice.
- Select practice routine. Update variables' names!!
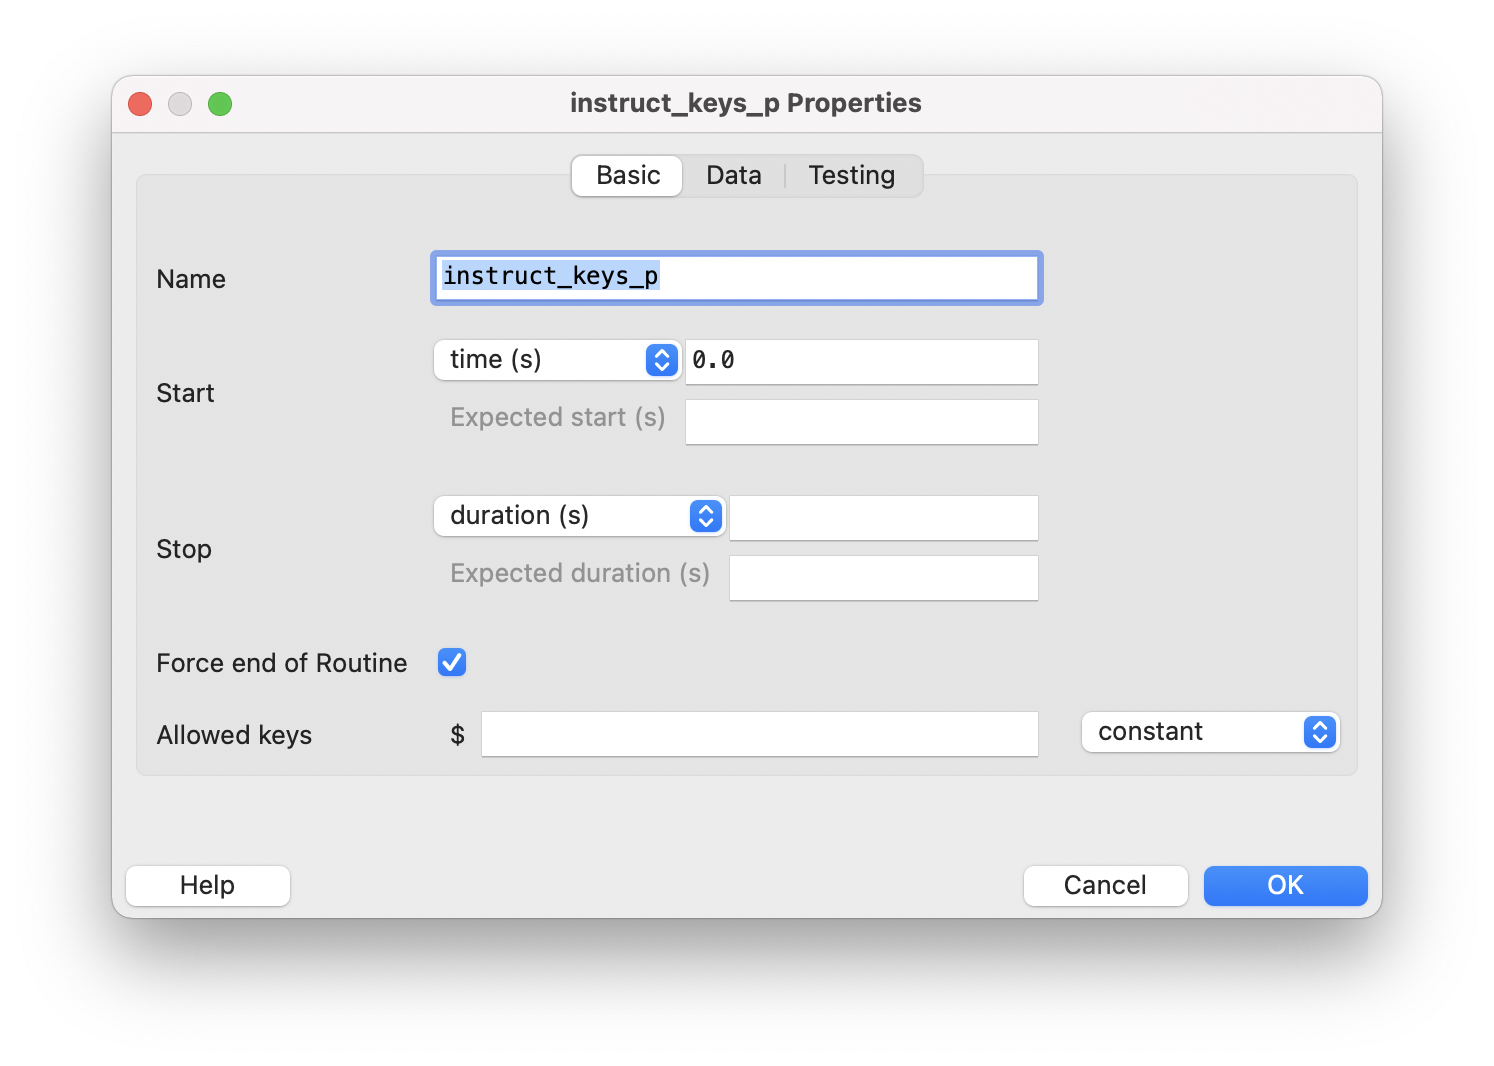
2.4.2. Instruction for Practice
2.4.2. Instruction for Practice
- Add a new routine before practice. Name it
instruct_p
- Add a text component. Name it
instruct_text_p- Start time: 0
- Duration: empty
- Text:
Please pay full attention and respond as fast and as accurately as possible.

You will see words flashing on the screen.
Your task is to indicate the ink colors of the letters, ignoring the word.

We ask you to ignore the content itself; press:
Left for red COLOR
Down for green COLOR
Right for blue COLOR

Press any key to start the practice trial
- Appearance: white
- Formatting: Arial, 0.02 font size
- Add a keyboard component. Name it
instruct_keys_p- Start: 0
- Duration: empty
- Force end of Routine: checked
- Allowed keys: empty
- In the Data section: leave the default options.

2.4.4. Instructions for the Main task
2.4.4. Instructions for the Main task
- Copy instructions from practice. Name it
instruct.
- Rename text component to
instruct_text.- Change text:
OK. Ready for the real thing?
Remember, ignore the content itself. Press:
Left for red COLOR
Down for green COLOR
Right for blue COLOR

Press any key to continue
- Change text:
- Rename keyboard component to
instruct_keys
2.4.5. Thank you message
2.4.5. Thank you message
- Add a new routine. Name it
thanks.
- Add text component. Name it
thanks_text.- Start time: 0
- Duration: 2.0
⚠️Participants tend to close the browser as soon as they see “thank you”. We will lose data if they do so. Therefore, I strongly advise you to avoid the keyboard component to end this last routine. I suggest adding a limit to the text instead, so participants can read the thank you note, and immediately the study saves the results and closes by itself. We don't want to give time to the participant to close the window.c. Add text:
This study ended.
Thank you.
d. Formatting: Arial, 0.02 font size
2.4.6. Consent
2.4.6. Consent
- Copy instruction routine. Name it
consent. Place it in the very beginning.
- Change the text component to
consent_text.- Text:
The present study arises in the context of a research project underway at ISCTE – Instituto Universitário de Lisboa. This study concerns human perception and aims to investigate emotional facilitation.

Your participation consists of two tasks and could take around a total of 15 minutes.

Please indicate if you accept participating in the study:

I ACCEPT (click space bar)
I DO NOT ACCEPT (click Escape)
- Formatting: Arial, size 0.02
- Text:
- Change the keyboard component to
consent_keys- Allowed keys:
'space'
⚠️Remember that we already said to PsychoPy that we want to use Escape as a quit key. - Allowed keys:
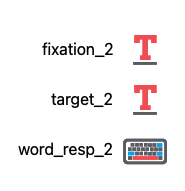
2.4.7. Adding a Stroop task with images
2.4.7. Adding a Stroop task with images

- Copy and paste the Stroop trial.
- Add an image component
- Start time: 2.0
- Duration: 3.0
- Image:
$imageRandset every repeat
- Layout: Size (0.6, 0.41). This is the size of our pictures. You should see the size on software like Photoshop or GIMP.
- Change the keyboard to
$corrAns_img
- Go to the Excel file and change the path if you are a windows user because windows use
\and mac uses/. So windows users should changepic/flower_red.jpgtopic\flower_red.jpg
- Change the loop to
img_trials. Insert the excel for this task with images.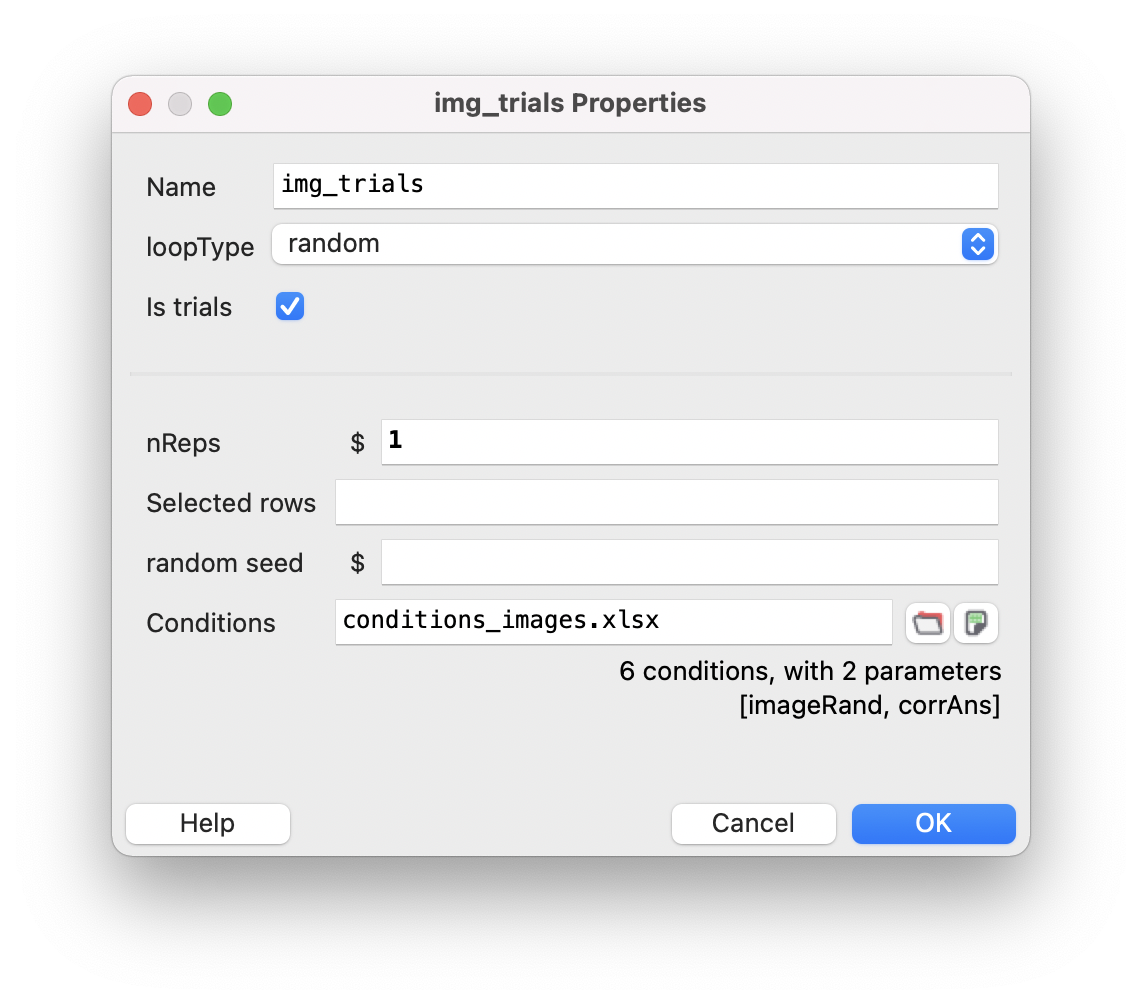
- Copy past instructions from practice. Name it
instruct_img- Change the text component to
instruct_text_img
- Change text:
Now you will see a series of color-filtered pictures, and you should indicate the color of each image as quickly as possible while ignoring the content of each picture.

Remember, ignore the content itself. Press:
Left for red COLOR
Down for green COLOR
Right for blue COLOR

Press any key to continue.
c. Change the name of the keyboard component to
instruct_keys_img - Change the text component to
3. Remarks on Data Collection
3.1. Options for saving data
If you choose to save only complete data...
- You will be charged only for completed participants.
- So, if the participant's browser is abruptly closed during the yellow pop-up (e.g., their computer turns off due to low battery), it's considered incomplete data. A log file will appear, but no data.
If you choose to save incomplete data...
- You will be charged for every participant who clicks on Start, even if they close the browser right after that.
- And Pavlovia tries to save the data when the participant double-clicks on Escape. A pop-up will appear to give Pavlovia time to send the data to the server, and the browser only closes when they click “leave” on that pop-up.
3.2. Data format
If you choose database format...
- All participants will be merged into one file.
- And they are ordered by the date of participation.
If you choose CSV format...
- Each participant will have an individual file.
- You can get columns arranged in a different order in each file.
- And the number of decimals used differs! You can get a file with only four decimals on the reaction time. That's less compared to the database format.
So my advice is to choose the database format. If you do so, when you click on Download Results in Pavlovia, you will get a folder with log files and just one CSV file.
3.4. How credits work
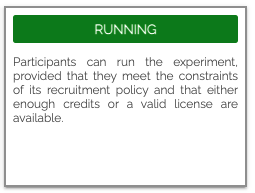
When you buy credits, you have to assign them!
- So after buying your credits, click RUNNING. You are going to see a green bar with all your credits. Now assign them, and you will see the bar changing to blue. That is what we want. If you leave it green, the credits are doing nothing to you. They are just sitting there.
- Now you can use your official URL. Don't confuse it with the pilot link you were using.
What are reserved credits?
- Credits are reserved when somebody starts your study.
- It will be consumed when the results are recorded (task completed or browser closed).
- It will be released from its “reserved” status after 24 hours. So if a participant is doing your study but goes to the bathroom and forgets that they were doing your study, you will have to wait 24 hours or until the participant closes the browser or complete your task.
4. Last remarks
4.1. Some notes on troubleshooting errors
- You should google the error message with
“psychopy”.
- PsychoPy has a forum for discussing errors. If you need help, go there. But you cannot delete your question afterward.
- Check your component, trial, or file names -> PsychoPy doesn't work with spaces, symbols, or too-long names. Don't use default names either (e.g., “trial” for trial, “text” for text component).
- Check if your experiment folder is in your home folder.
- Delete the js and index file [on your computer] and rerun it to force an update.
- Clean your cookies on Pavlovia to force an update.
- If PsychoPy doesn't acknowledge a new file condition after doing the two previous steps, you should create a new folder and copy your stimuli, condition files, and psyexp file. Associate this with a new project.
4.2. Good practices
- Don't change your PsychoPy version while collecting data or building your experiment! Find previous versions here (https://github.com/psychopy/psychopy/releases).
- Write something on every commit. If your study goes wrong, you can find a working version and restore it. Pavlovia and GitLab save EVERY version of your study every time you commit.
- Don't edit files on GitLab.
- You can fork projects instead of downloading them, so you can acknowledge that person's efforts.
- Configure SSH Key on your Gitlab account to protect the connection between your computer and Pavlovia's server.
- Run pilot tests in different browsers, different computers, and different operating systems.
5. Securing your computer to Gitlab (optional, but strongly advised)
5.1. macOS users
5.1. macOS users
- Open a terminal (Launchpad > on Search bar write “terminal”).
- Copy and paste this code (after the %):
ssh-keygen -t ed25519 -C "email@example.com"- Change to the email associated with your Pavlovia account.
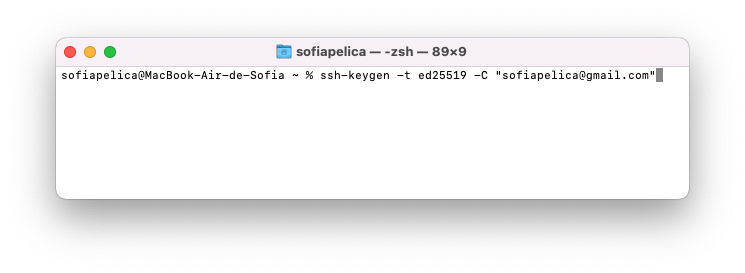
- Click Enter.
- Next, you will be asked to choose a file path to save your SSH key pair. If you don't already have an SSH key pair, use the suggested path by pressing Enter.
- You will be prompted to write a password to secure your new SSH key pair. It's not required, and you can skip it by pressing Enter twice.
- Now, it's time to add the newly created public key to your GitLab account. Copy and paste this code:
pbcopy < ~/.ssh/id_ed25519.pub
- Click on the text window. Press Ctrl and V simultaneously. You will see a set of letters and your email.
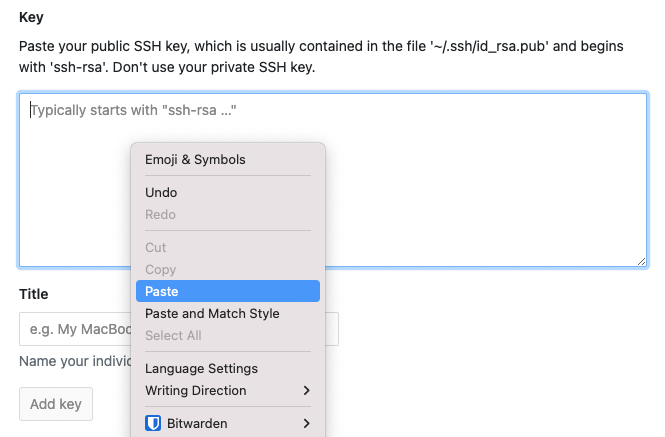
- Click on
Add a keybutton.
5.2. Windows users
5.2. Windows users
- Install Git Bash and open it.
- Copy and paste this code (after the %):
ssh-keygen -t ed25519 -C "email@example.com"- Change to the email associated with your Pavlovia account.
- Click Enter.
- Next, you will be asked to choose a file path to save your SSH key pair. If you don't already have an SSH key pair, use the suggested path by pressing Enter.
- You will be prompted to write a password to secure your new SSH key pair. It's not required, and you can skip it by pressing Enter twice.
- Now, it's time to add the newly created public key to your GitLab account. Copy and paste this code:
cat ~/.ssh/id_ed25519.pub | clip
- Click on the text window. Press Ctrl and V simultaneously. You will see a set of letters and your email.
- Click on
Add a keybutton.
6. Useful resources
7. Extras
7.1. Measure the participant's total time
- Go to the very last routine you have in your flow.
- Add a Code component. Change the default name.
- Change code type to JS.
- Go to
End Experiment
- Add this text:
psychoJS.experiment.addData("globalClockTime", globalClock.getTime());
psychoJS.experiment.nextEntry();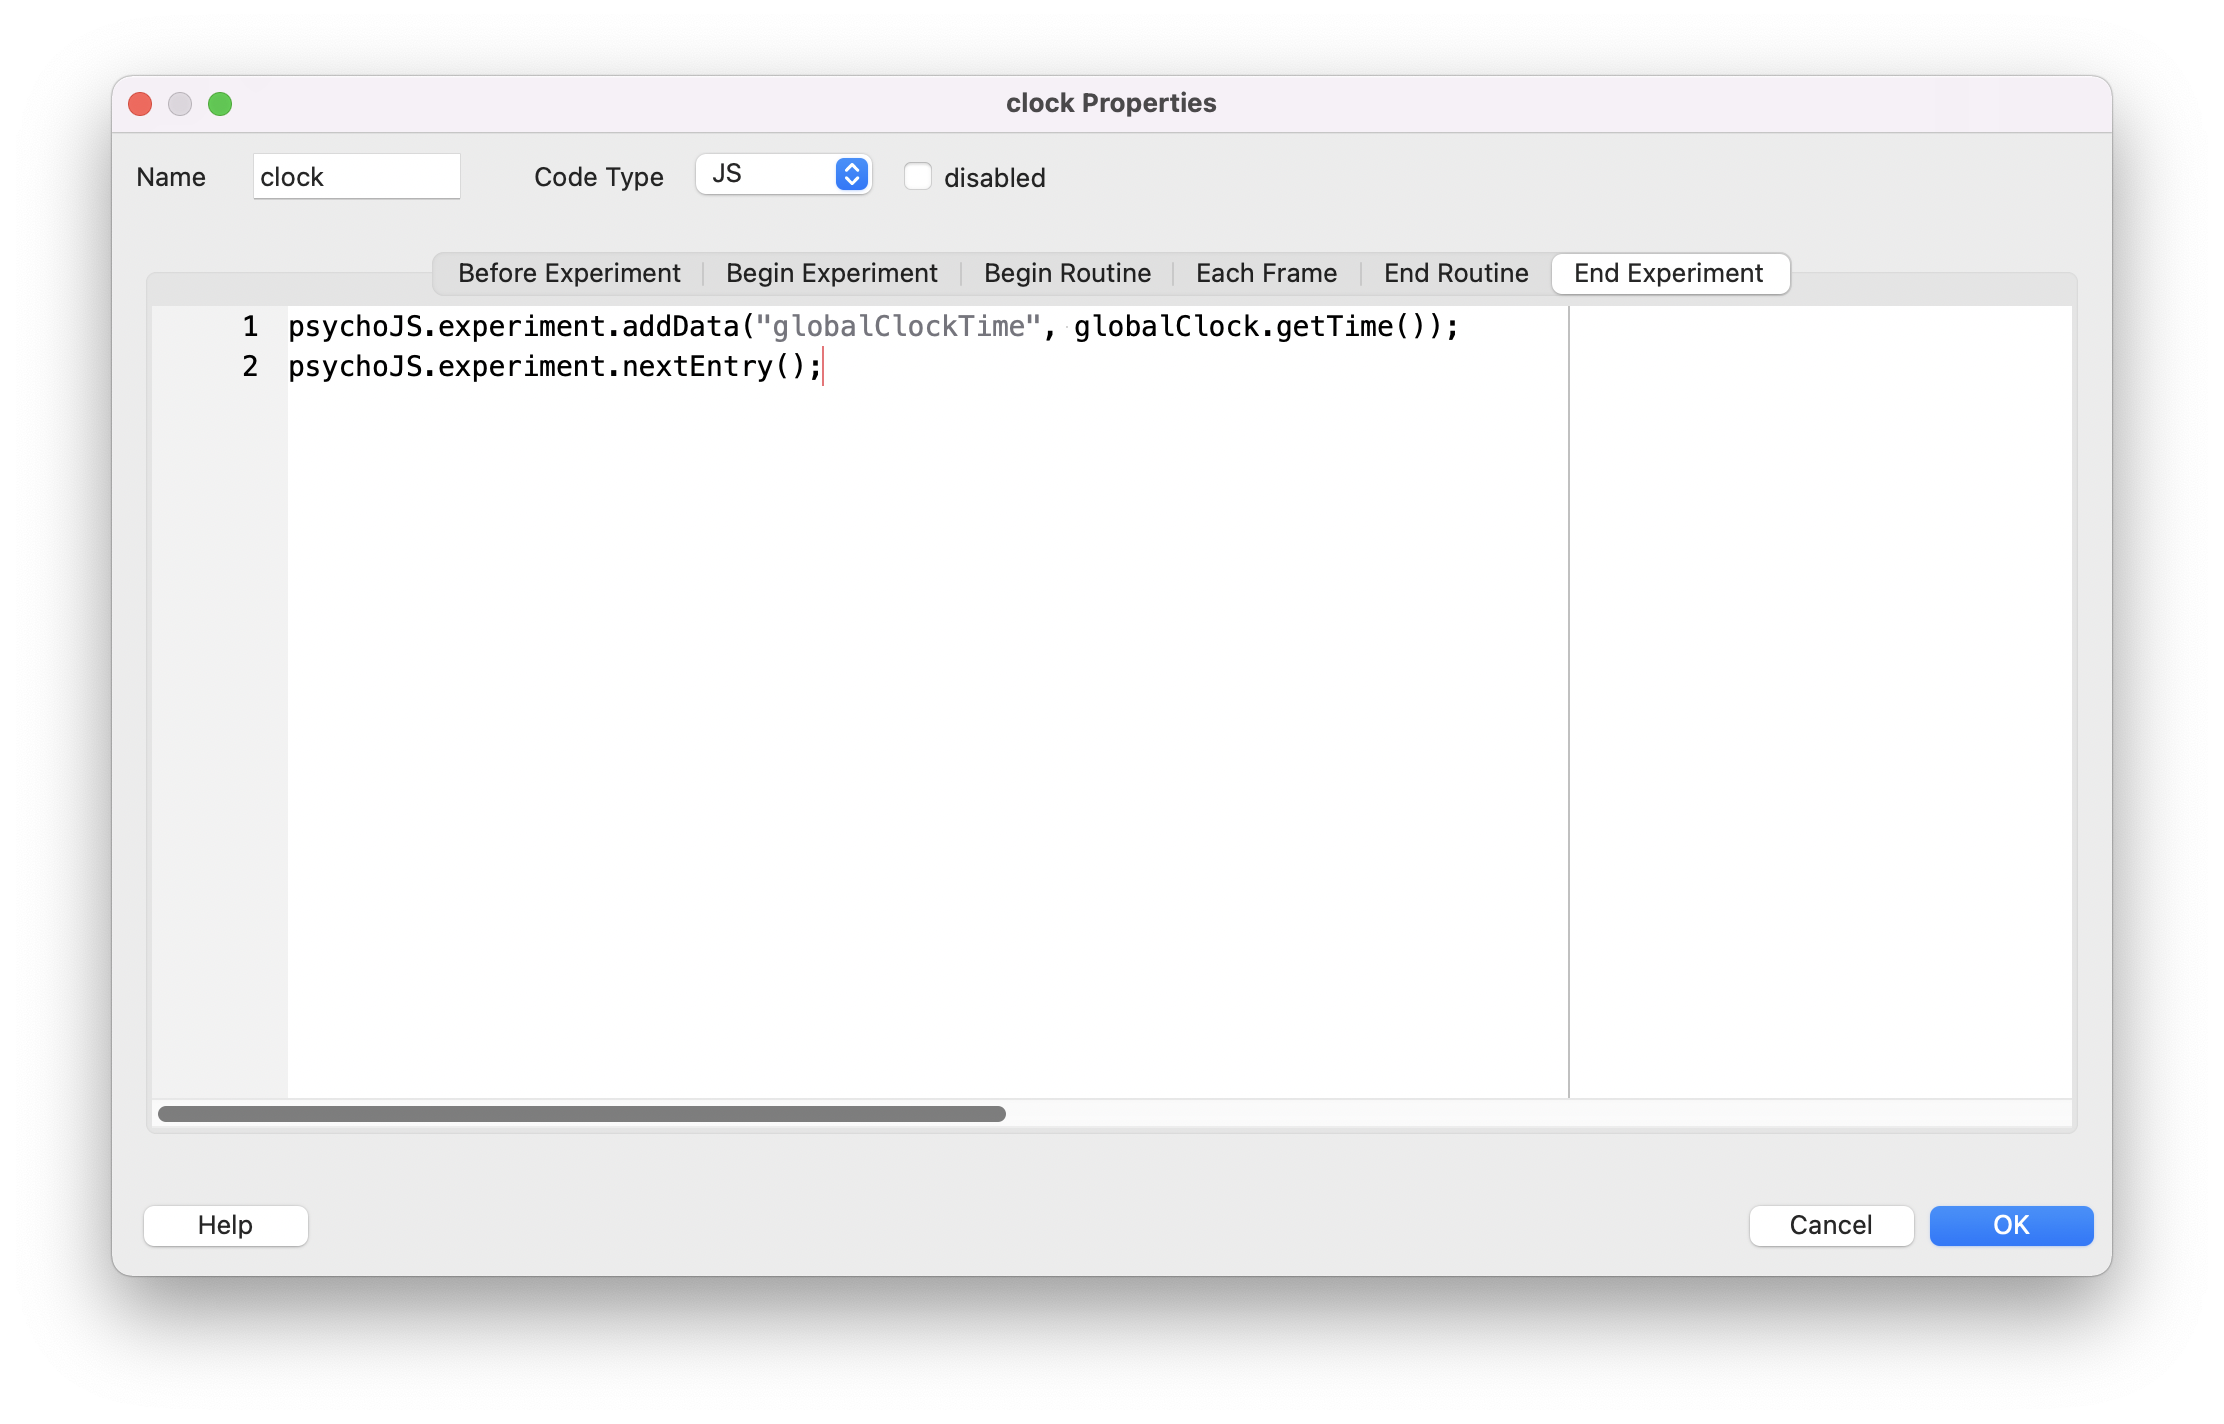
Note: The last column of the data file will have the global clock time in seconds.
7.2. Hide mouse cursor
- Go to the routine that has the task where you want to hide the mouse.
- Add a Code component. Place it at the top of the components. Change the default name.
- Change code type to JS.
- Go to
Begin routine
- Add this text:
document.body.style.cursor='none';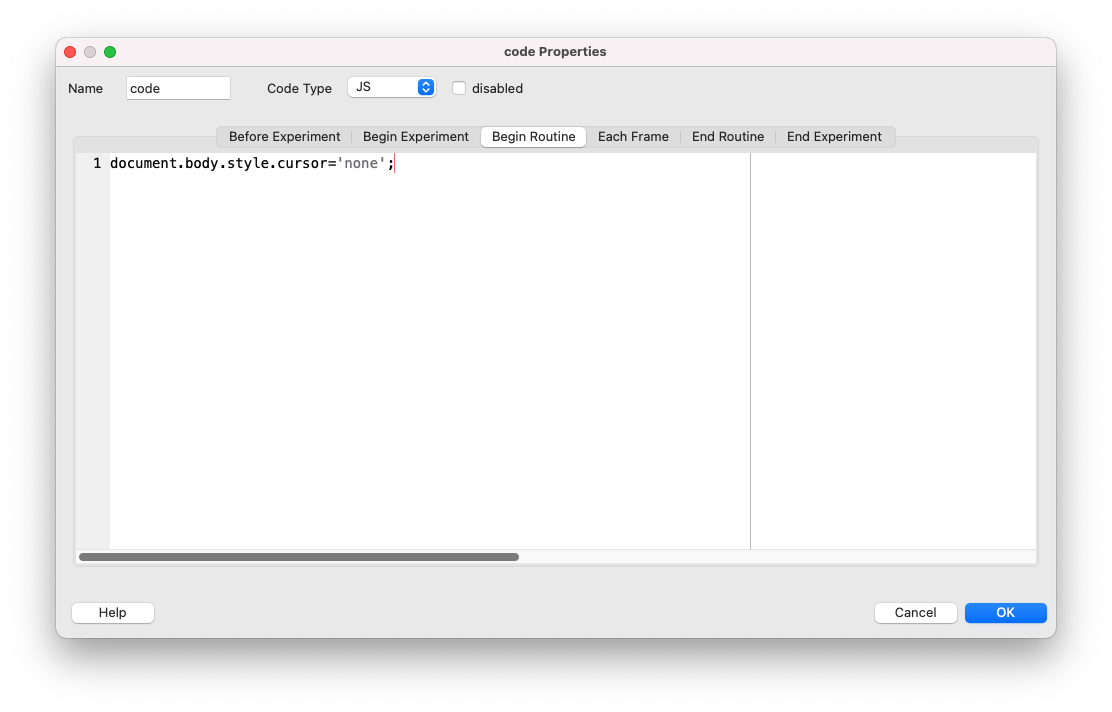
Note: If you have another task after, you need to add the following code if you want to un-hide it (following the same steps before):
document.body.style.cursor='auto';You should enable the mouse again in the last routine, so participants can click “OK” in the green pop-up after completion.
7.3. Stop your task from running if the participant is using mobile phones
- Add a new routine at the very beginning of your flow.
- Add a code component. Change the default name.
- Change the Code Type to JS.
- Go to
Before Experiment.
- Add text:
if( /Android|webOS|iPhone|iPad|iPod|BlackBerry|IEMobile|Opera Mini/i.test(navigator.userAgent) ) {
quitPsychoJS('Mobile device detected. Goodbye!', false)
}
Note: Don't add anything else to this routine.
7.4. Setting up a pipeline with Qualtrics
Imagine you want to insert a large set of questions before and after the experimental task. In that case, I advise you to use a pipeline connecting a pre-survey Qualtrics, then redirect to Pavlovia and send the ID, and finally redirect to the post-survey Qualtrics. You will use two qualtric surveys, but the participant won't notice it.
- Go to your Qualtrics survey, then to the survey flow.
- Add two new embedded data fields and name it:
participantandsession
- For the session, let's just write
qualtricsto make sure what is the origin of the participants on Pavlovia.
- In the right box, click on insert Pipped Text>Random Number>Integer>min:1 max:1000. Define this as appropriate for your study.

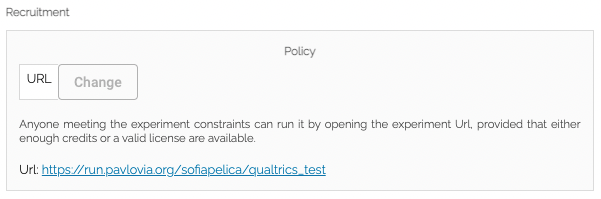
- Go to your study on Pavlovia, and click on Running Mode.
- Copy the link under the Recruitment tab.
- Go back to Qualtrics and edit the end of the survey.
- Select Redirect to URL. Paste the link of your study hosted on Pavlovia and add:
LINK?participant=${e://Field/participant}&session=${e://Field/session}Example:
https://run.pavlovia.org/sofiapelica/qualtrics_connection/?participant=${e://Field/participant}&session=${e://Field/session}
This will now pass the Participant ID and session from Qualtrics to Pavlovia.
You should also add a "Then Branch" and a customized "End of Survey" if participants do not accept the consent form to ensure they will not be redirected to Pavlovia.
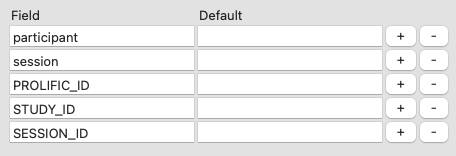
- In Psychopy, go to Settings. Make sure you have
participantandsessionvariables in the info dialog and that their right columns are empty. These variables are case-sensitive!
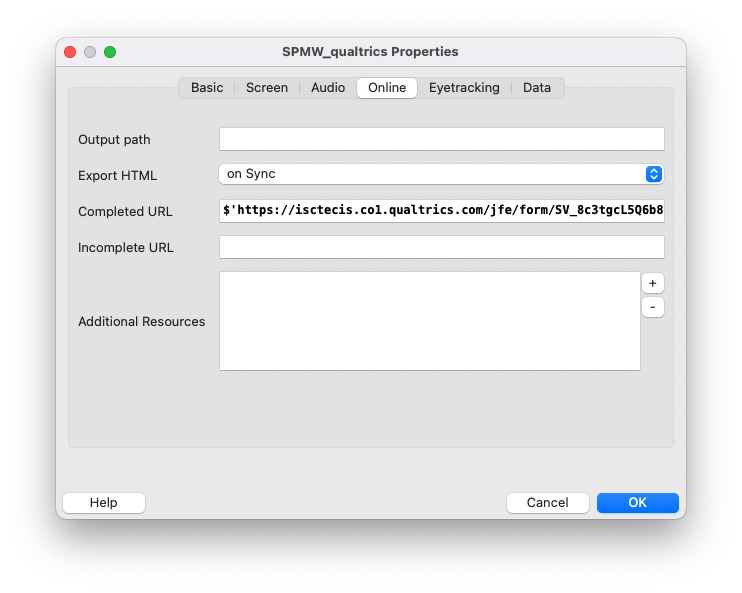
- Then go to the Online tab.
- In the Complete URL you should add the link to redirect participants after completing the pavlovia task (for example, to the post-survey qualtrics):
$'LINK?participant=' + expInfo['participant'] + "&session=" + expInfo['session']Example:
$'https://isctecis.co1.qualtrics.com/jfe/form/SV_8c3tgcL5Q6b8pvg?participant=' + expInfo['participant'] + "&session=" + expInfo['session']
Note: In this pipeline, participants start with a qualtrics survey, are redirected to pavlovia, and then are redirected back to qualtrics. A separated post-survey ensures they will encounter the exact items we want and avoid problems with the browser cache. In the end, you will have three files of the same participant.
If you think you only need a pre-survey and the task, skip the last post-survey step.
Pre-survey:

Pavlovia:

Post-survey:

Note: These files resulted from my testing; it's not a participant's data.
Download the PsychoPy and Qualtrics demos:
📎 Workshop_PsychoPy_Pre.qsf📎 qualtrics_connectionPsychoPy.zip
📎 Workshop_PsychoPy_Post.qsf
7.5. Pipeline Prolific → Qualtrics → Pavlovia → Qualtrics → Pavlovia
If you are interested in using these steps to connect to Prolific, you just have to add “PROLIFIC_PID”, “STUDY_ID”, and “SESSION_ID” following the same steps.
Since Prolific will give these variables values, the pre-survey should have "value will be set from panel or URL".
Don't forget to also have these new variables in the info dialog of your PsychoPy study. In the post-survey, the end message should redirect to the Prolific with the code parameters (e.g., https://app.prolific.co/submissions/complete?cc=86319F9F).
If you are not doing the post-survey, then in the Complete URL of PsychoPy you could just put the prolific link directly.
Info Dialog:
Redirect URL from pre-survey in End message:
https://run.pavlovia.org/sofiapelica/qualtrics_connection/?participant=${e://Field/participant}&session=${e://Field/session}&PROLIFIC_ID=${e://Field/PROLIFIC_ID}&STUDY_ID=${e://Field/STUDY_ID}&SESSION_ID=${e://Field/SESSION_ID}Complete URL:
$'https://isctecis.co1.qualtrics.com/jfe/form/SV_8c3tgcL5Q6b8pvg?participant=' + expInfo['participant'] + "&session=" + expInfo['session'] + "&PROLIFIC_ID=" + expInfo['PROLIFIC_ID'] + "&STUDY_ID=" + expInfo['STUDY_ID']+ "&SESSION_ID=" + expInfo['SESSION_ID']
8. My demos
8.1. Stroop Task with words and images

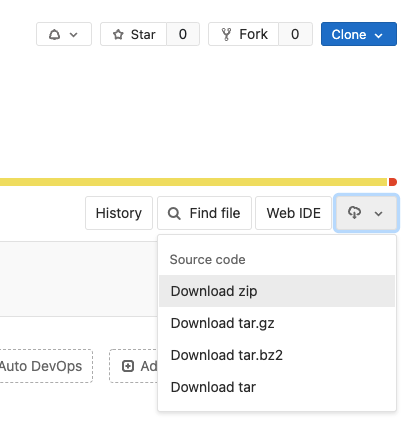
Files
https://gitlab.pavlovia.org/sofiapelica/stroop-with-words-and-images
You can fork this project or download it.
References
Oh, J., Han, M., Peterson, B. S., & Jeong, J. (2012). Spontaneous eyeblinks are correlated with responses during the Stroop task. PloS one, 7(4), e34871. https://doi.org/10.1371/journal.pone.0034871
Shibasaki, M., Isomura, T., & Masataka, N. (2014). Viewing images of snakes accelerates making judgments of their color in humans: Red snake effect as an instance of 'emotional Stroop facilitation'. Royal Society Open Science, 1(3), 140066. https://doi.org/10.1098/rsos.140066
Stroop, J. R. (1935). Studies of interference in serial verbal reactions. Journal of Experimental Psychology, 18(6), 643–662. https://doi.org/10.1037/h0054651
8.2. N-Back letters with feedback

This is a 2-back task with letters and feedback. It has 52 trials. The first two trials are considered null.
Each stimulus is presented for 500 milliseconds. People get 3 seconds to respond. A new stimulus is presented every 3000 milliseconds.
When the participant correctly presses the z key because the letter matched the letter two trials ago, it is considered a match (1). When the participant presses the z key wrongly, it's regarded as a false alarm (0). Also, the missed target is coded as 0.
Files
https://gitlab.pavlovia.org/sofiapelica/nback
References
Kirchner, W. K. (1958). Age differences in short-term retention of rapidly changing information. Journal of Experimental Psychology, 55(4), 352-358. https://doi.org/10.1037/h0043688
Jaeggi, S. M., Buschkuehl, M., Perrig, W. J., & Meier, B. (2010). The concurrent validity of the N-back task as a working memory measure. Memory, 18(4), 394–412. https://doi.org/10.1080/09658211003702171
Kane, M. J., Conway, A., Miura, T. K., & Colflesh, G. (2007). Working memory, attention control, and the N-back task: A question of construct validity. Journal of Experimental Psychology: Learning, Memory, and Cognition, 33(3), 615–622. https://doi.org/10.1037/0278-7393.33.3.615
8.4. Moving Window Self-Paced Reading

This is a moving-window self-paced reading paradigm introduced by Just et al. (1982).
This paradigm allows readers to use button presses to control the exposure duration for each word of a text they read. The latencies of the button presses depend on the properties of the words being read and correlate with the time course of the cognitive processes during reading and text comprehension.
Files
https://gitlab.pavlovia.org/sofiapelica/self-paced-reading-moving-window
References
Just, M. A., Carpenter, P. A., & Woolley, J. D. (1982). Paradigms and processes in reading comprehension. Journal of Experimental Psychology: General, 111(2), 228-238.
Keller, F., Gunasekharan, S., Mayo, N., & Corley, M. (2009). Timing accuracy of Web experiments: A case study using the WebExp software package. Behavior Research Methods, 41(1), 1-12.
Feel free to copy these demos and adapt them to your study. Researchers should support each other.

9. Troubleshooting
| Problem | Resolution |
|---|---|
| “Initialising study” message is stuck | Check your settings for the dialog window and data filename. |
| “Unknown resource” | Delete the .js and index.html files in your folder. Commit again. If this error persists, go to settings > online section > add your resource there. If this error keeps persisting, then create a new folder on your computer, copy every file of your study, and submit it as a new project in Pavlovia. |
| Runner window gives an error, and I can't submit it into Pavlovia | Read the error message and try to correct it. If this problem persists, save your psychoPy file, close the file, close PsychoPy and open it again. |
| Error saying that certain variable is not defined. | Go to the component that uses this variable and check if it's “set every repeat” instead of “constant”. |
